Prometheus简介:
Prometheus是基于Go语言开发的一套开源的监控、 报警和时间序列数据库的组合, 是由SoundCloud公司开发(2012年)的开源监控系统, Prometheus于2016年加入CNCF( Cloud Native Computing Foundation,云原生计算基金会) ,2018年8月9日prometheus成为CNCF继kubernetes 之后毕业的第二个项目, prometheus在容器和微服务领域中得到了广泛的应用, 其主要优缺点如下:
- 使用key-value的多维度(多个角度, 多个层面, 多个方面)格式保存数据
- 数据不使用MySQL这样的传统数据库, 而是使用时序数据库, 目前是使用的TSDB
- 支持第三方dashboard实现更绚丽的图形界面, 如grafana(Grafana 2.5.0版本及以上)
- 组件模块化
- 不需要依赖存储, 数据可以本地保存也可以远程保存
- 平均每个采样点仅占3.5 bytes, 且一个Prometheus server可以处理数百万级别的的metrics指标数据。
- 支持服务自动化发现(基于consul等方式动态发现被监控的目标服务)
- 强大的数据查询语句功(PromQL,Prometheus Query Language)
- 数据可以直接进行算术运算
- 易于横向伸缩
- 众多官方和第三方的exporter(“ 数据” 导出器)实现不同的指标数据收集
CNCF 基金会已经毕业的项目: https://www.cncf.io/projects
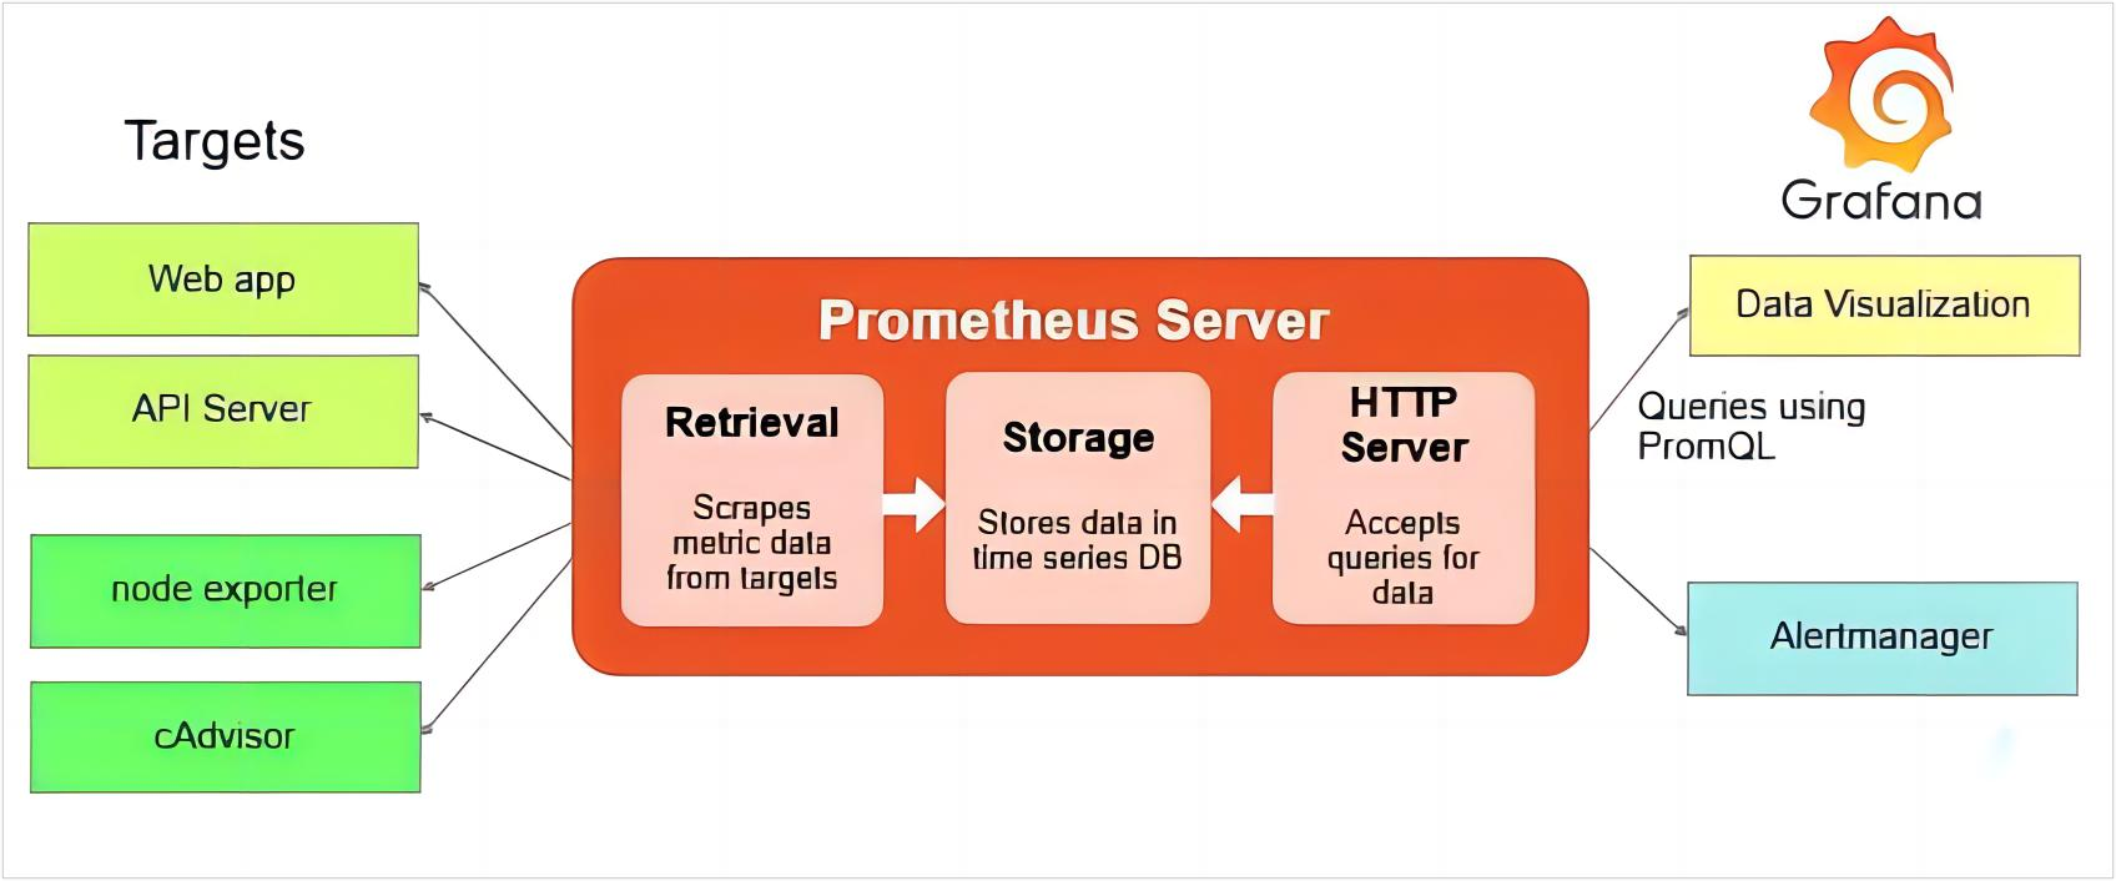
Prometheus 架构:
- prometheus server: 主服务, 接受外部http请求、 收集指标数据、 存储指标数据与查询指标数据等。
- prometheus targets: 静态发现目标后执行指标数据抓取。
- service discovery: 动态发现目标后执行数据抓取。
- prometheus alerting: 调用alertmanager组件实现报警通知。
- push gateway: 数据收集代理服务器(类似于zabbix proxy但仅限于client主动push数据至push gateway)。
- data visualization and export:数据可视化与数据导出(浏览器或其它client)。

数据采集流程、 TSDB简介;
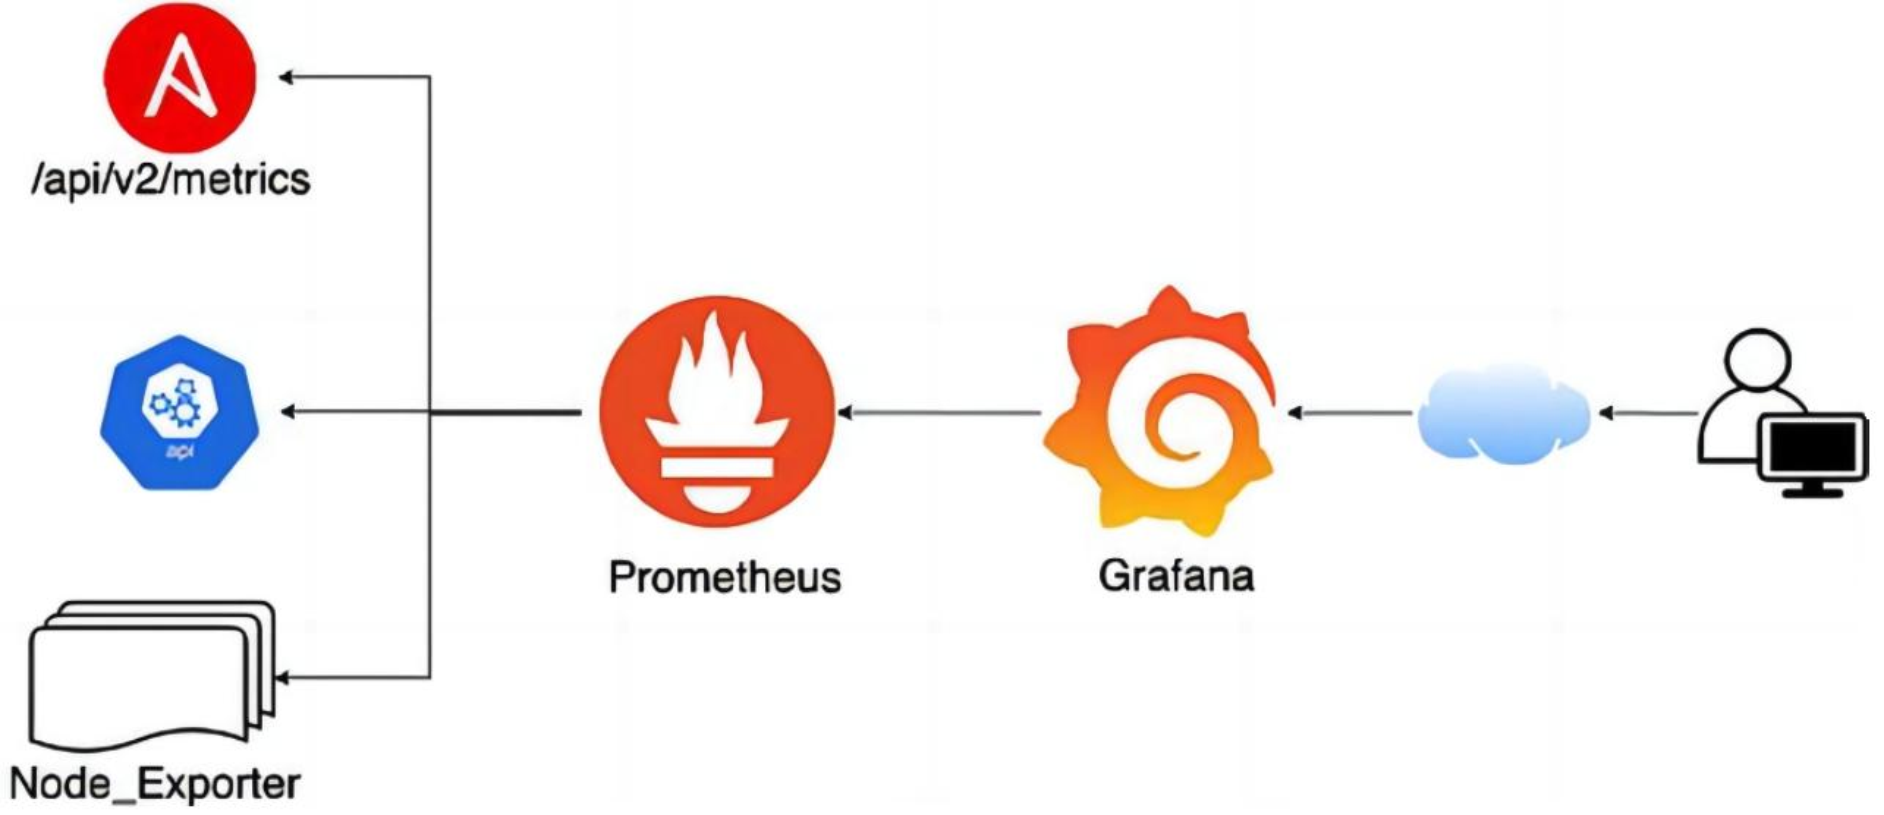
Prometheus数据采集流程:
- 基于静态配置文件或动态发现获取目标
- 向目标URL发起http/https请求
- 目标接受请求并返回指标数据
- prometheus server接受并数据并对比告警规则, 如果触发告警则进一步执行告警动作并存储数据, 不触发告警则只进行数据存储
- grafana进行数据可视化
TSDB简介及特点
TSDB简介:
- Prometheus有着非常高效的时间序列数据存储方法, 每个采样数据仅仅占用3.5byte左右空间, 上百万条时间序列, 30秒间隔, 保留60天,大概200多G空间( 引用官方资料) 。
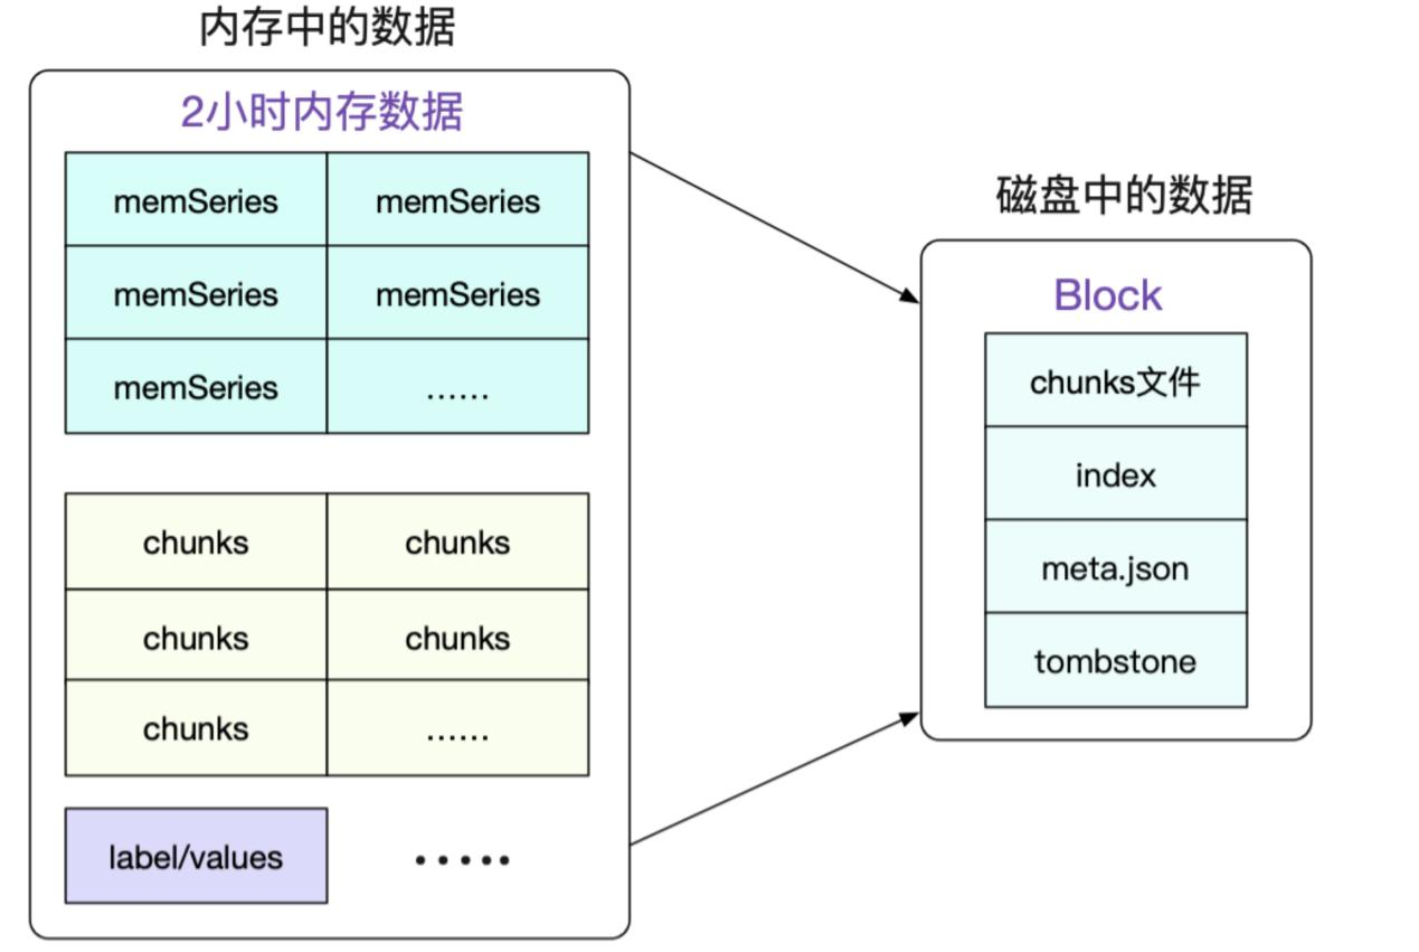
- 默认情况下, prometheus将采集到的数据存储在本地的TSDB数据库中, 路径默认为prometheus安装目录的data目录, 数据写入过程为先把数据写入wal日志并放在内存, 然后2小时后将内存数据保存至一个新的block块, 同时再把新采集的数据写入内存并在2小时后再保存至一个新block块,以此类推。
- prometheus先将采集的指标数据保存到内存的chunk中, chunk是prometheus存储数据的最基本单元。
- 每间隔两个小时, 将当前内存的多个chunk统一保存至一个block中并进行数据合并、 压缩、 并生成元数据文件index、 meta.json和tombstones
阿里云的商业T时序数据库产品
https://www.aliyun.com/product/hitsdb
TSDB特点
- TSDB: Time Series Database , 简称 TSDB, 存放时间序列数据的数据库
- 时间序列数据具有不变性、 唯一性和按照时间排序的特性。
- 持续周期性写入数据、 高并发吞吐: 每间隔一段时间,就会写入成千上万的节点的指标数据。
- 写多读少: prometheus每间隔15s就会采集数十万或更多指标数据, 但通常只查看最近比较重要的指标数据。
- 数据按照时间排列: 每次收集的指标数据, 写入时都是按照当前时间往后进行写入, 不会覆盖历史数据。
- 数据量大: 历史数据会有数百G甚至数百T或更多。
- 时效性: 只保留最近一段时间的数据, 超出时效的数据会被删除。
- 冷热数据分明: 通常只查看最近的热数据, 以往的冷数据很少查看。
TSDB-block特性:
block会压缩、 合并历史数据块, 以及删除过期的块, 随着压缩、 合并, block的数量会减少, 在压缩过程中会发生三件事: 定期执行压缩、 合并小的block到大的block、 清理过期的块, 每个块有4部分组成:
tree /apps/prometheus/data/01FQNCYZ0BPFA8AQDDZM1C5PRN/
/apps/prometheus/data/01FQNCYZ0BPFA8AQDDZM1C5PRN/
├── chunks
│ └── 000001    #数据目录,每个大小为512MB超过会被切分为多个
├── index       #索引文件, 记录存储的数据的索引信息, 通过文件内的几个表来查找时序数据
├── meta.json   #block元数据信息, 包含了样本数、 采集数据数据的起始时间、 压缩历史
└── tombstones  #逻辑数据, 主要记载删除记录和标记要删除的内容, 删除标记, 可在查询块时排除样本。
TSDB-block简介:
每个block为一个data目录中以01开头的存储目录, 如下:
ls -l /apps/prometheus/data/
total 4
drwxr-xr-x 3 root root    68 Oct 10 19:01 01HCCKYCZXW40V7KQP295KK2TD #block
drwxr-xr-x 3 root root    68 Oct 13 01:02 01HCJDAH1WM0EQGA5H0Q9FYANY #block
drwxr-xr-x 3 root root    68 Oct 15 07:02 01HCR6PW52WZ45K8YF4XWCFFPA #block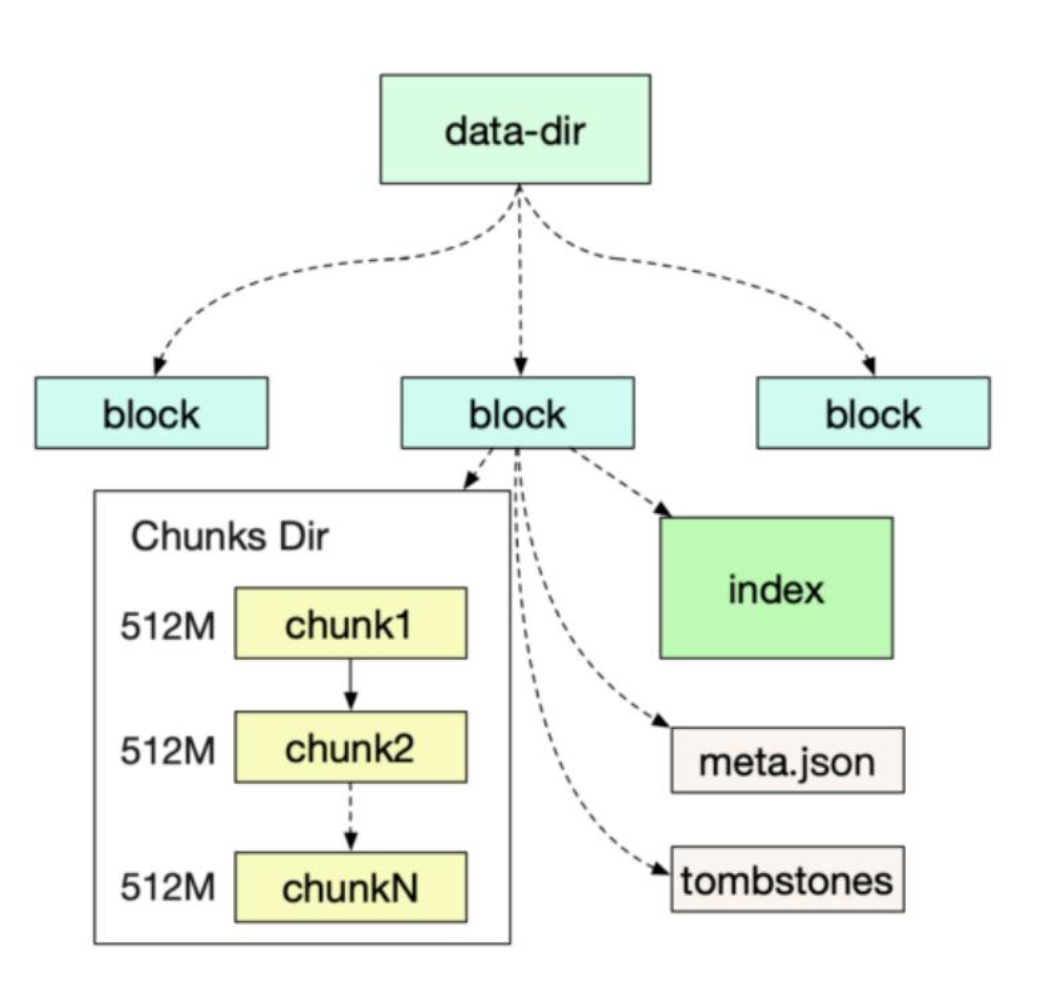
部署Prometheus Server和各类Exporter完成目标监控;
Prometheus 可以通过不同的方式安装部署prometheus监控环境,但是实际生产环境只需要根据实际需求选择其中一种方式部署即可, 而且无论是使用哪一种方式安装部署的prometheus server,以后的使用都是一样的:
- 使用apt或者yum安装
apt install prometheus - 基于官方提供的二进制文件安装
https://prometheus.io/download - 基于docker镜像直接启动或通过docker-compose编排
https://prometheus.io/docs/prometheus/latest/installation - 基于operator部署在kubernetes环境部署
https://github.com/prometheus-operator/kube-prometheus
基于二进制部署:
基础架构:
Prometheus-Server        10.2.0.18
Prometheus-Node01        10.2.0.21
Prometheus-pushgateway   10.2.0.24
解压服务文件到指定目录;
root@prometheus-server:~# mkdir /apps
root@prometheus-server:~#tar xvf prometheus-2.47.1.linux-amd64.tar.gz -C /apps/ && ln -sf /apps/prometheus-2.47.1.linux-amd64 /apps/prometheus && cd /apps/prometheus && ll
total 236868
drwxr-xr-x  6 1001  127      4096 Oct 17 13:50 ./
drwxr-xr-x  3 root root      4096 Oct 15 13:20 ../
drwxr-xr-x  2 1001  127      4096 Oct  4 19:05 console_libraries/
drwxr-xr-x  2 1001  127      4096 Oct  4 19:05 consoles/
drwxr-xr-x 11 root root      4096 Oct 19 09:00 data/
-rw-r--r--  1 1001  127     11357 Oct  4 19:05 LICENSE
-rw-r--r--  1 1001  127      3773 Oct  4 19:05 NOTICE
-rwxr-xr-x  1 1001  127 124158156 Oct  4 18:35 prometheus*      #prometheus服务可执行程序
-rw-r--r--  1 1001  127      1226 Oct 17 13:37 prometheus.yml   #prometheus配置文件
-rwxr-xr-x  1 1001  127 118343283 Oct  4 18:38 promtool*        #测试工具, 用于检测配置prometheus配置文件、 检测metrics数据等
root@prometheus-server:/apps/prometheus#./promtool check config prometheus.yml
Checking prometheus.yml
 SUCCESS: prometheus.yml is valid prometheus config file syntax
创建启动service文件:
cat /etc/systemd/system/prometheus.service
[Unit]
Description=Prometheus Server
Documentation=https://prometheus.io/docs/introduction/overview/
After=network.target

[Service]
Restart=on-failure
WorkingDirectory=/apps/prometheus/
ExecStart=/apps/prometheus/prometheus \
--config.file=/apps/prometheus/prometheus.yml \
--web.enable-lifecycle \
--storage.tsdb.retention=30d \
--web.enable-admin-api

[Install]
WantedBy=multi-user.target
参数解释:
/apps/prometheus/prometheus:Prometheus 可执行文件路径。
--config.file=/apps/prometheus/prometheus.yml:指定 Prometheus 配置文件的路径。
--web.enable-lifecycle:启用 Prometheus 的 Web 生命周期功能,该功能允许通过 HTTP 请求启动、停止和重新加载 Prometheus。
--storage.tsdb.retention=30d:指定 Prometheus 时序数据库 (TSDB) 的数据保留时间,为 30 天。
--web.enable-admin-api:启用 Prometheus 的 Web 管理 API,该 API 允许用户执行各种管理操作,例如创建和删除快照、查询警报状态等。
启动服务:
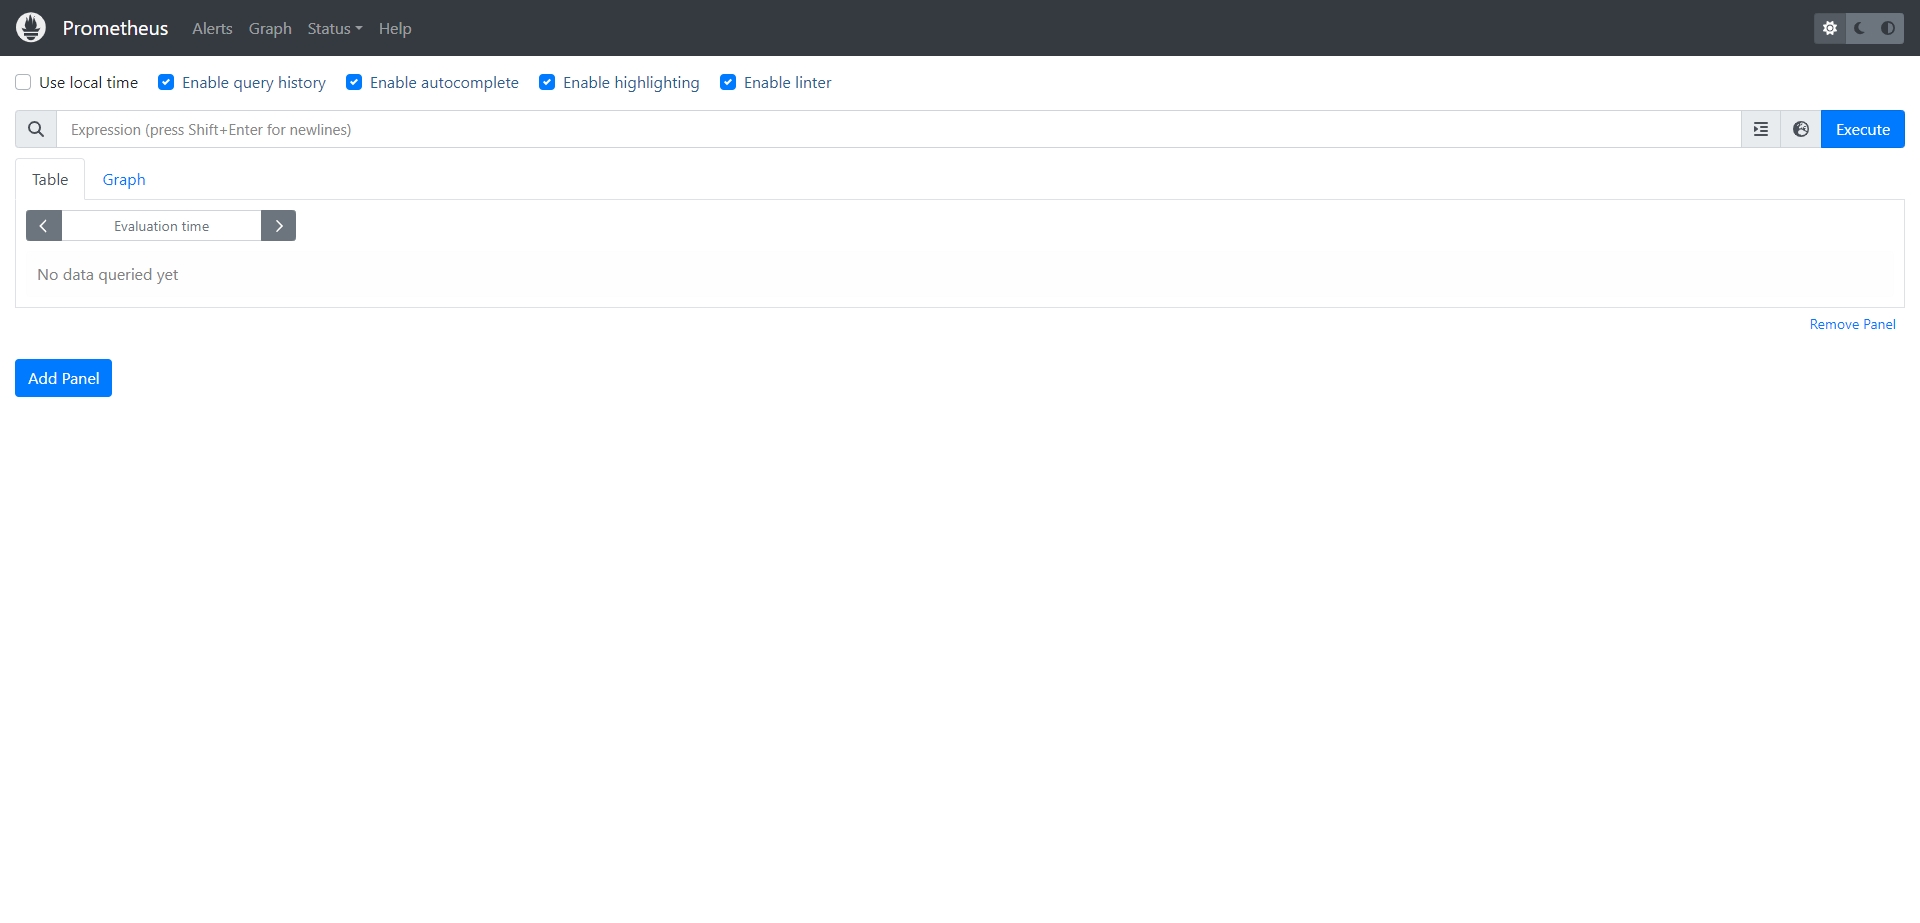
systemctl daemon-reload && systemctl restart prometheus && systemctl enable prometheus.service验证prometheus web界面:
prometheus配置文件主要参数:
- --config.file="prometheus.yml" #指定配置文件
- --web.listen-address="0.0.0.0:9090" #指定监听地址
- --storage.tsdb.path="data/" #指定数存储目录
- --storage.tsdb.retention.size=B, KB, MB, GB, TB, PB, EB #指定block大小, 默认512MB
- --storage.tsdb.retention.time= #数据保存时长, 默认15天
- --query.timeout=2m #最大查询超时时间
- -query.max-concurrency=20 #最大查询并发数
- --web.read-timeout=5m #最大空闲超时时间
- --web.max-connections=512 #最大并发连接数
- --web.enable-lifecycle #启用API动态加载配置功能
部署node_exporter:
解压服务文件到指定目录;
root@prometheus-node_exporter01:~# mkdir /apps
root@prometheus-node_exporter01:~#tar xvf node_exporter-1.6.1.linux-amd64.tar.gz -C /apps/ && ln -sf /apps/node_exporter-1.6.1.linux-amd64 /apps/node_exporter
创建service文件:
cat /etc/systemd/system/node-exporter.service
[Unit]
Description=Prometheus Node Exporter
After=network.target

[Service]
ExecStart=/apps/node_exporter/node_exporter

[Install]
WantedBy=multi-user.target
启动node-exporter:
root@prometheus-node_exporter01:~#systemctl daemon-reload && systemctl restart node-exporter.service && systemctl enable node-exporter.service验证node_exporter web界面:


Prometheus数据简介:
- metric: 指标, 有各自的metric name, 是一个key value(键值)格式组成的某个监控项数据。
- labels: 标签, 用于对相同名称的指标进行删选, 一个指标可以同时有多个不同的标签。
- samples: 样本, 存在于TSDB中的数据, 有三部分组成:
指标(包含metric name和labels)
值(value, 指标数据)
时间戳(指标写入的时间) - series: 序列, 有多个samples组成的时间序列数据。
Node节点指标数据收集:
配置Prometheus server收集Node-exporter指标数据:
root@prometheus-server:~# vim /apps/prometheus/prometheus.yml
  - job_name: 'prometheus-node_exporter'
    scrape_interval: 5s
    static_configs:
      - targets: ['10.2.0.21:9100']
重启服务使配置生效:
systemctl restart prometheus.serviceweb UI验证能否正常收集Node-exporter指标数据

Node节点常见指标:
- node_boot_time: 系统自启动以后的总计时间
- node_cpu: 系统CPU使用量
- node_disk*: 磁盘IO
- node_filesystem*: 系统文件系统用量
- node_load1: 系统CPU负载
- node_memory*: 内存使用量
- node_network*: 网络带宽指标
- node_time: 当前系统时间
- go_*: node exporter中go相关指标
- process_*: node exporter自身进程相关运行指标
基于Operator一键部署prometheus监控系统:
Operator部署器是基于已经编写好的yaml文件,可以将prometheus server、alertmanager、grafana、node-exporter等组件一键批量部署
基础环境
Kubernetes Cluster Version:v1.27.2
kube-prometheus Version:v0.13.0
kube-prometheus项目地址&下载地址:
项目地址:https://github.com/prometheus-operator/kube-prometheus
下载地址:https://github.com/prometheus-operator/kube-prometheus/archive/refs/tags/v0.13.0.tar.gz
部署kube-prometheus:
1、解压文件并进入yaml配置目录
tar zxvf kube-prometheus-0.13.0.tar.gz && cd kube-prometheus-0.13.02、修改镜像地址
root@k8s-master-1:~/kube-prometheus-0.13.0#grep image: manifests/*.yaml
alertmanager-alertmanager.yaml:  image: registry.cn-shanghai.aliyuncs.com/qwx_images/alertmanager:v0.26.0
blackboxExporter-deployment.yaml:        image: registry.cn-shanghai.aliyuncs.com/qwx_images/blackbox-exporter:v0.24.0
blackboxExporter-deployment.yaml:        image: registry.cn-shanghai.aliyuncs.com/qwx_images/configmap-reload:v0.5.0
blackboxExporter-deployment.yaml:        image: registry.cn-shanghai.aliyuncs.com/qwx_images/kube-rbac-proxy:v0.15.0
grafana-deployment.yaml:        image: registry.cn-shanghai.aliyuncs.com/qwx_images/grafana:10.2.0
kubeStateMetrics-deployment.yaml:        image: registry.cn-shanghai.aliyuncs.com/qwx_images/kube-state-metrics:v2.10.0
kubeStateMetrics-deployment.yaml:        image: registry.cn-shanghai.aliyuncs.com/qwx_images/kube-rbac-proxy:v0.15.0
kubeStateMetrics-deployment.yaml:        image: registry.cn-shanghai.aliyuncs.com/qwx_images/kube-rbac-proxy:v0.15.0
nodeExporter-daemonset.yaml:        image: registry.cn-shanghai.aliyuncs.com/qwx_images/node-exporter:v1.6.1
nodeExporter-daemonset.yaml:        image: registry.cn-shanghai.aliyuncs.com/qwx_images/kube-rbac-proxy:v0.15.0
prometheusAdapter-deployment.yaml:        image: registry.cn-shanghai.aliyuncs.com/qwx_images/prometheus-adapter:v0.11.1
prometheusOperator-deployment.yaml:        image: registry.cn-shanghai.aliyuncs.com/qwx_images/prometheus-operator:v0.68.0
prometheusOperator-deployment.yaml:        image: registry.cn-shanghai.aliyuncs.com/qwx_images/kube-rbac-proxy:v0.15.0
prometheus-prometheus.yaml:  image: registry.cn-shanghai.aliyuncs.com/qwx_images/prometheus-linux-amd64:v2.47.2
3、创建CRD
kubectl apply --server-side -f manifests/setup4、检测CRD资源是否创建完成
kubectl wait \
  --for condition=Established \
  --all CustomResourceDefinition \
  --namespace=monitoring
参数解释
wait 命令用于等待 Kubernetes 中的资源达到指定的状态。
--for condition=Established:指定要等待的资源状态。等待所有 CustomResourceDefinition (CRD) 的状态都变为Established。
--all CustomResourceDefinition:指定要等待的资源类型。等待所有 CRD。
--namespace=monitoring:指定要等待的资源所在的命名空间。等待 monitoring 命名空间中的所有 CRD。
5、删除Grafana和Prometheus的NetworkPolicy文件
rm -rf grafana-networkPolicy.yaml prometheus-networkPolicy.yaml6、把Grafana和prometheus的SVC文件改成NodePort端口以供集群外部机器访问
cat grafana-service.yaml
apiVersion: v1
kind: Service
metadata:
  labels:
    app.kubernetes.io/component: grafana
    app.kubernetes.io/name: grafana
    app.kubernetes.io/part-of: kube-prometheus
    app.kubernetes.io/version: 9.5.3
  name: grafana
  namespace: monitoring
spec:
  type: NodePort
  ports:
  - name: http
    port: 3000
    nodePort: 33000
    targetPort: http
  selector:
    app.kubernetes.io/component: grafana
    app.kubernetes.io/name: grafana
    app.kubernetes.io/part-of: kube-prometheus

cat prometheus-service.yaml
apiVersion: v1
kind: Service
metadata:
  labels:
    app.kubernetes.io/component: prometheus
    app.kubernetes.io/instance: k8s
    app.kubernetes.io/name: prometheus
    app.kubernetes.io/part-of: kube-prometheus
    app.kubernetes.io/version: 2.46.0
  name: prometheus-k8s
  namespace: monitoring
spec:
  type: NodePort
  ports:
  - name: web
    port: 9090
    nodePort: 39090
    targetPort: web
  - name: reloader-web
    port: 8080
    targetPort: reloader-web
  selector:
    app.kubernetes.io/component: prometheus
    app.kubernetes.io/instance: k8s
    app.kubernetes.io/name: prometheus
    app.kubernetes.io/part-of: kube-prometheus
  sessionAffinity: ClientIP
7、apply manifests目录下所有文件
kubectl apply -f manifests/8、验证是否Pod是否正常
root@k8s-master-1:~# kubectl get pod,svc -n monitoring
NAME                                       READY   STATUS    RESTARTS     AGE
pod/alertmanager-main-0                    2/2     Running   0            161m
pod/alertmanager-main-1                    2/2     Running   0            161m
pod/alertmanager-main-2                    2/2     Running   0            162m
pod/blackbox-exporter-857ff47d99-698cv     3/3     Running   0            172m
pod/grafana-5896f7bc7b-nxpgq               1/1     Running   1 (2d ago)   2d16h
pod/kube-state-metrics-9d84d8856-2clgv     3/3     Running   0            169m
pod/node-exporter-2fzqm                    2/2     Running   0            3h5m
pod/node-exporter-5bm7g                    2/2     Running   0            3h5m
pod/node-exporter-5wtsd                    2/2     Running   0            3h5m
pod/node-exporter-7t2fd                    2/2     Running   0            3h5m
pod/node-exporter-vhk5k                    2/2     Running   0            3h6m
pod/node-exporter-wfnwq                    2/2     Running   0            3h6m
pod/prometheus-adapter-7745b55777-2xxdd    1/1     Running   2 (2d ago)   2d17h
pod/prometheus-adapter-7745b55777-vlt7v    1/1     Running   2 (2d ago)   2d17h
pod/prometheus-k8s-0                       2/2     Running   0            124m
pod/prometheus-k8s-1                       2/2     Running   0            125m
pod/prometheus-operator-7bbfffb859-hjtwn   2/2     Running   0            162m

NAME                            TYPE        CLUSTER-IP       EXTERNAL-IP   PORT(S)                         AGE
service/alertmanager-main       ClusterIP   10.100.11.157    <none>        9093/TCP,8080/TCP               2d17h
service/alertmanager-operated   ClusterIP   None             <none>        9093/TCP,9094/TCP,9094/UDP      2d17h
service/blackbox-exporter       ClusterIP   10.100.132.79    <none>        9115/TCP,19115/TCP              2d17h
service/grafana                 NodePort    10.100.204.12    <none>        3000:33000/TCP                  2d17h
service/kube-state-metrics      ClusterIP   None             <none>        8443/TCP,9443/TCP               2d17h
service/node-exporter           ClusterIP   None             <none>        9100/TCP                        2d17h
service/prometheus-adapter      ClusterIP   10.100.139.100   <none>        443/TCP                         2d17h
service/prometheus-k8s          NodePort    10.100.32.94     <none>        9090:39090/TCP,8080:42589/TCP   2d17h
service/prometheus-operated     ClusterIP   None             <none>        9090/TCP                        2d17h
service/prometheus-operator     ClusterIP   None             <none>        8443/TCP                        2d17h
9、访问Prometheus Web UI
http://10.2.0.1:33000/

10、访问Grafana Web UI
http://10.2.0.1:33000

基于DaemonSet部署cadvisor、node-exporter。Deployment部署Prometheus Server
监控Pod指标数据需要使用cadvisor,cadvisor由谷歌开源,在kubernetes v1.11及之前的版本内置在kubelet中并监听在4194端口(https://github.com/kubernetes/kubernetes/pull/65707),从v1.12开始kubelet中的cadvisor被移除,因此需要单独通过daemonset等方式部署。cadvisor(容器顾问)不仅可以收集一台机器上所有运行的容器信息,还提供基础查询界面和http接口,方便其他组件如Prometheus进行数据抓取,cAdvisor可以对节点机器上的容器进行实时监控和性能数据采集,包括容器的CPU使用情况、内存使用情况、网络吞吐量及文件系统使用情况。
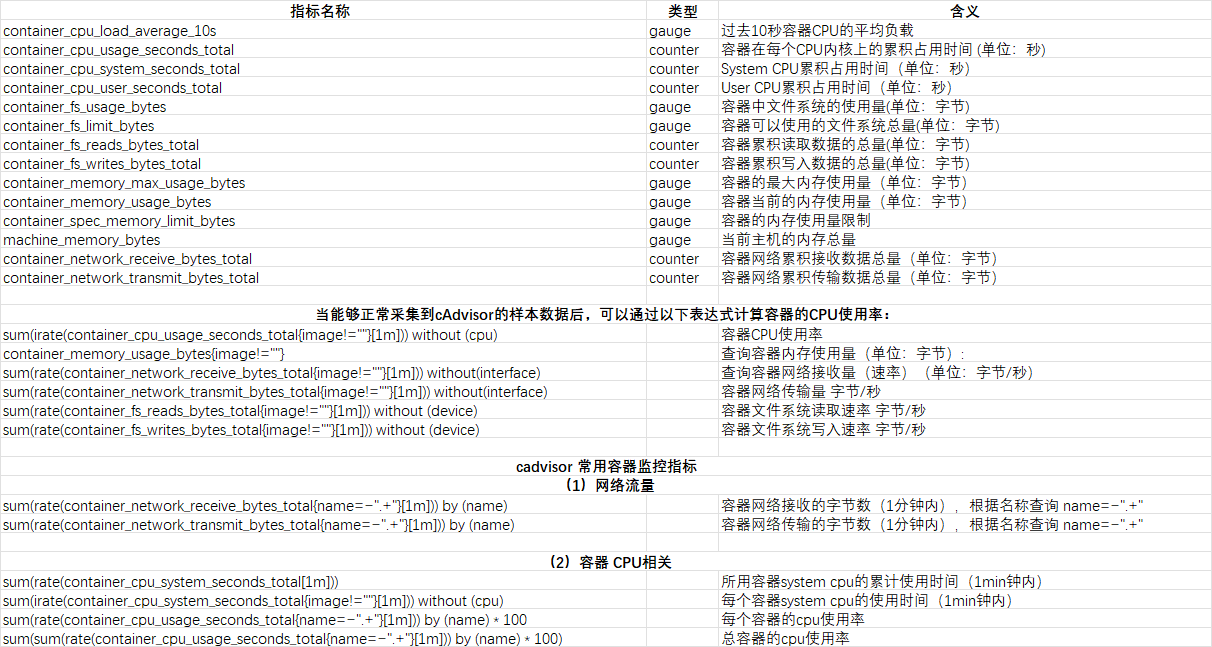
cadvisor的DaemonSet的文件,使用官方镜像:
apiVersion: v1
kind: Namespace
metadata:
  name: monitoring
---
apiVersion: apps/v1
kind: DaemonSet
metadata:
  name: cadvisor
  namespace: monitoring
spec:
  selector:
    matchLabels:
      app: cAdvisor
  template:
    metadata:
      labels:
        app: cAdvisor
    spec:
      tolerations:    #污点容忍,忽略master的NoSchedule
        - effect: NoSchedule
          key: node-role.kubernetes.io/master
            #hostNetwork: true 取消注释后可以使用集群以外的Prometheus-Server来访问集群内的Pod指标数据
      restartPolicy: Always   # 重启策略
      containers:
      - name: cadvisor
        image: registry.cn-shanghai.aliyuncs.com/qwx_images/cadvisor-amd64:v0.47.2
        imagePullPolicy: IfNotPresent  # 镜像策略
        resources:
          limits:
            memory: "512Mi"
            cpu: "500m"
          requests:
            memory: "512Mi"
            cpu: "500m"
        ports:
        - containerPort: 8080
        volumeMounts:
          - name: root
            mountPath: /rootfs
            readOnly: true
          - name: run
            mountPath: /var/run
            readOnly: true
          - name: sys
            mountPath: /sys
            readOnly: true
          - name: containerd
            mountPath: /var/lib/containerd
            readOnly: true
          - name: devdisk
            mountPath: /devdisk
            readOnly: true
      volumes:
      - name: root
        hostPath:
          path: /
      - name: run
        hostPath:
          path: /var/run
      - name: sys
        hostPath:
          path: /sys
      - name: containerd
        hostPath:
          path: /var/lib/containerd
      - name: devdisk
        hostPath:
          path: /dev/disk
DaemonSet部署node-exporter:
apiVersion: apps/v1
kind: DaemonSet
metadata:
  name: node-exporter
  namespace: monitoring
  labels:
    k8s-app: node-exporter
spec:
  selector:
    matchLabels:
        k8s-app: node-exporter
  template:
    metadata:
      labels:
        k8s-app: node-exporter
    spec:
      tolerations:
        - effect: NoSchedule
          key: node-role.kubernetes.io/master
      containers:
        image: registry.cn-shanghai.aliyuncs.com/qwx_images/node-exporter:v1.6.1
        imagePullPolicy: IfNotPresent
        name: prometheus-node-exporter
        ports:
        - containerPort: 9100
          hostPort: 9100
          protocol: TCP
          name: metrics
        volumeMounts:
        - mountPath: /host/proc
          name: proc
        - mountPath: /host/sys
          name: sys
        - mountPath: /host
          name: rootfs
        args:
        - --path.procfs=/host/proc
        - --path.sysfs=/host/sys
        - --path.rootfs=/host
      volumes:
        - name: proc
          hostPath:
            path: /proc
        - name: sys
          hostPath:
            path: /sys
        - name: rootfs
          hostPath:
            path: /
---
apiVersion: v1
kind: Service
metadata:
  annotations:
    prometheus.io/scrape: "true"
  labels:
    k8s-app: node-exporter
  name: node-exporter
  namespace: monitoring
spec:
  #type: NodePort
  ports:
  - name: http
    port: 9100
    #nodePort: 39100
    protocol: TCP
  selector:
    k8s-app: node-exporter
验证Pod:
# kubectl get pod -n monitoring
NAME               READY STATUS RESTARTS AGE
cadvisor-2r9kl      1/1  Running 0       98m
cadvisor-8z886      1/1  Running 0       98m
cadvisor-9h2b9      1/1  Running 0       98m
node-exporter-4jmq4 1/1  Running 0       39s
node-exporter-58t26 1/1  Running 0       39s
node-exporter-drdf2 1/1  Running 0       39s
Deployment部署Prometheus Server:
1、创建Prometheus Server的ConfigMap
apiVersion: v1
kind: ConfigMap
metadata:
  labels:
    app: prometheus
  name: prometheus-config
  namespace: monitoring
data:
  prometheus.yml: |
    global:
      scrape_interval: 15s
      scrape_timeout: 10s
      evaluation_interval: 1m
    scrape_configs:
    - job_name: 'kube-state-metrics'
      static_configs:
        - targets: ['kube-state-metrics:8080']

    - job_name: 'kubernetes-node'
      kubernetes_sd_configs:
      - role: node
      relabel_configs:
      - source_labels: [__address__]
        regex: '(.*):10250'
        replacement: '${1}:9100'
        target_label: __address__
        action: replace
      - action: labelmap
        regex: __meta_kubernetes_node_label_(.+)
    - job_name: 'kubernetes-node-cadvisor'
      kubernetes_sd_configs:
      - role:  node
      scheme: https
      tls_config:
        ca_file: /var/run/secrets/kubernetes.io/serviceaccount/ca.crt
      bearer_token_file: /var/run/secrets/kubernetes.io/serviceaccount/token
      relabel_configs:
      - action: labelmap
        regex: __meta_kubernetes_node_label_(.+)
      - target_label: __address__
        replacement: kubernetes.default.svc:443
      - source_labels: [__meta_kubernetes_node_name]
        regex: (.+)
        target_label: __metrics_path__
        replacement: /api/v1/nodes/${1}/proxy/metrics/cadvisor
    - job_name: 'kubernetes-apiserver'
      kubernetes_sd_configs:
      - role: endpoints
      scheme: https
      tls_config:
        ca_file: /var/run/secrets/kubernetes.io/serviceaccount/ca.crt
      bearer_token_file: /var/run/secrets/kubernetes.io/serviceaccount/token
      relabel_configs:
      - source_labels: [__meta_kubernetes_namespace, __meta_kubernetes_service_name, __meta_kubernetes_endpoint_port_name]
        action: keep
        regex: default;kubernetes;https
    - job_name: 'kubernetes-service-endpoints'
      kubernetes_sd_configs:
      - role: endpoints
      relabel_configs:
      - source_labels: [__meta_kubernetes_service_annotation_prometheus_io_scrape]
        action: keep
        regex: true
      - source_labels: [__meta_kubernetes_service_annotation_prometheus_io_scheme]
        action: replace
        target_label: __scheme__
        regex: (https?)
      - source_labels: [__meta_kubernetes_service_annotation_prometheus_io_path]
        action: replace
        target_label: __metrics_path__
        regex: (.+)
      - source_labels: [__address__, __meta_kubernetes_service_annotation_prometheus_io_port]
        action: replace
        target_label: __address__
        regex: ([^:]+)(?::\d+)?;(\d+)
        replacement: $1:$2
      - action: labelmap
        regex: __meta_kubernetes_service_label_(.+)
      - source_labels: [__meta_kubernetes_namespace]
        action: replace
        target_label: kubernetes_namespace
      - source_labels: [__meta_kubernetes_service_name]
        action: replace
        target_label: kubernetes_name

    - job_name: 'kubernetes-nginx-pods'
      kubernetes_sd_configs:
      - role: pod
        #namespaces: #可选指定namepace,如果不指定就是发现所有的namespace中的pod
        #  names:
        #  - myserver
        #  - magedu
      relabel_configs:
      - source_labels: [__meta_kubernetes_pod_annotation_prometheus_io_scrape]
        action: keep
        regex: true
      - source_labels: [__meta_kubernetes_pod_annotation_prometheus_io_scheme]
        action: replace
        target_label: __scheme__
        regex: (https?)
      - source_labels: [__address__, __meta_kubernetes_pod_annotation_prometheus_io_port]
        action: replace
        target_label: __address__
        regex: ([^:]+)(?::\d+)?;(\d+)
        replacement: $1:$2
      - action: labelmap
        regex: __meta_kubernetes_pod_label_(.+)
      - source_labels: [__meta_kubernetes_namespace]
        action: replace
        target_label: kubernetes_namespace
      - source_labels: [__meta_kubernetes_pod_name]
        action: replace
        target_label: kubernetes_pod_name
kubectl apply -f prometheus-cfg.yaml
2、部署Prometheus-Server
2.1、将Prometheus数据目录挂载在nfs中,提前准备数据目录并授权:
root@nfs:~#mkdir -p /data/prometheusdata
root@nfs:~#cat /etc/exports
/data/prometheusdata *(rw,no_root_squash)
root@nfs:~#chmod 777 /data/prometheusdata && systemctl restart nfs-server
2.2、创建监控账号:
root@k8s-master01:~#kubectl create serviceaccount monitor -n monitoring2.3、对monitor账号授权:
kubectl create clusterrolebinding monitor-clusterrolebinding -n monitoring --clusterrole=cluster-admin --serviceaccount=monitoring:monitor
2.4、创建Deployment控制器:
apiVersion: apps/v1
kind: Deployment
metadata:
  name: prometheus-server
  namespace: monitoring
  labels:
    app: prometheus
spec:
  replicas: 1
  selector:
    matchLabels:
      app: prometheus
      component: server
  template:
    metadata:
      labels:
        app: prometheus
        component: server
      annotations:
        prometheus.io/scrape: 'false'
    spec:
      serviceAccountName: monitor
      containers:
      - name: prometheus
        image: registry.cn-shanghai.aliyuncs.com/qwx_images/prometheus-linux-amd64:v2.47.2
        imagePullPolicy: IfNotPresent
        command:
          - prometheus
          - --config.file=/etc/prometheus/prometheus.yml
          - --storage.tsdb.path=/prometheus
          - --storage.tsdb.retention=720h
        resources:
          limits:
            memory: "512Mi"
            cpu: "500m"
          requests:
            memory: "512Mi"
            cpu: "500m"
        ports:
        - containerPort: 9090
          protocol: TCP
        volumeMounts:
        - mountPath: /etc/prometheus/prometheus.yml
          name: prometheus-config
          subPath: prometheus.yml
        - mountPath: /prometheus/
          name: prometheus-storage-volume
      volumes:
        - name: prometheus-config
          configMap:
            name: prometheus-config
            items:
              - key: prometheus.yml
                path: prometheus.yml
                mode: 0644
        - name: prometheus-storage-volume
          nfs:
            server: 10.2.0.10
            path: /data/prometheusdata
2.5、验证Pod:
NAME                                   READY   STATUS    RESTARTS       AGE
cadvisor-2r9kl                         1/1     Running   0              5h48m
cadvisor-8z886                         1/1     Running   0              5h49m
cadvisor-9h2b9                         1/1     Running   0              5h49m
node-exporter-4jmq4                    1/1     Running   0              5h59m
node-exporter-58t26                    1/1     Running   1 (2d3h ago)   2d19h
node-exporter-drdf2                    1/1     Running   0              5h57m
prometheus-server-77d99f79d7-ftmv8     1/1     Running   2 (2d3h ago)   2d20h
2.6、创建SVC
apiVersion: v1
kind: Service
metadata:
  name: prometheus
  namespace: monitoring
  labels:
    app: prometheus
spec:
  type: NodePort
  ports:
    - port: 9090
      targetPort: 9090
      nodePort: 39090
      protocol: TCP
  selector:
    app: prometheus
    component: server
2.7、验证SVC:
NAME                    TYPE        CLUSTER-IP       EXTERNAL-IP   PORT(S)                         AGE
prometheus              NodePort    10.100.204.12    <none>        9090:39090/TCP                  2d20h
2.8、UI访问Prometheus
http://10.2.0.1:39090

Grafana 二进制部署及使用:
Grafana简介:
Grafana是一个可视化组件, 用于接收客户端浏览器的请求并连接到prometheus查询数据, 最后经过渲染并在浏览器进行体系化显示, 需要注意的是, grafana查询数据类似于zabbix一样需要自定义模板, 模板可以手动制作也可以导入已有模板。
官网
https://grafana.com/ 模板下载
https://grafana.com/grafana/dashboards/
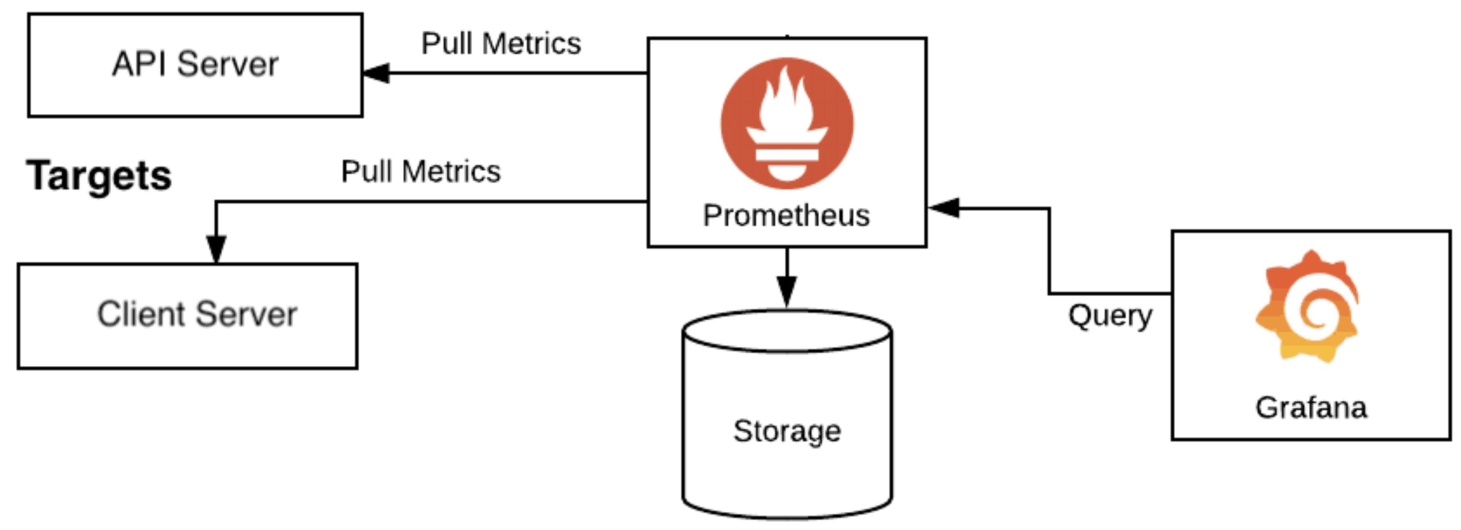
Grafana 部署及使用:
下载并安装Grafana
https://grafana.com/grafana/download?pg=get&plcmt=selfmanaged-box1-cta1
root@prometheus-server:~# apt-get install -y adduser libfontconfig1 musl
root@prometheus-server:~# wget https://dl.grafana.com/enterprise/release/grafana-enterprise_10.1.5_amd64.deb
root@prometheus-server:~# dpkg -i grafana-enterprise_10.1.5_amd64.deb
root@prometheus-server:~# vim /etc/grafana/grafana.ini
[server]
# Protocol (http, https, socket)
protocol = http
# The ip address to bind to, empty will bind to all interfaces
http_addr = 0.0.0.0
# The http port to use
http_port = 3000
启动Grafana
systemctl restart grafana-server && systemctl enable grafana-server登录Grafana web界面:

默认登录账户信息:
- 默认账户:admin
- 默认密码:admin
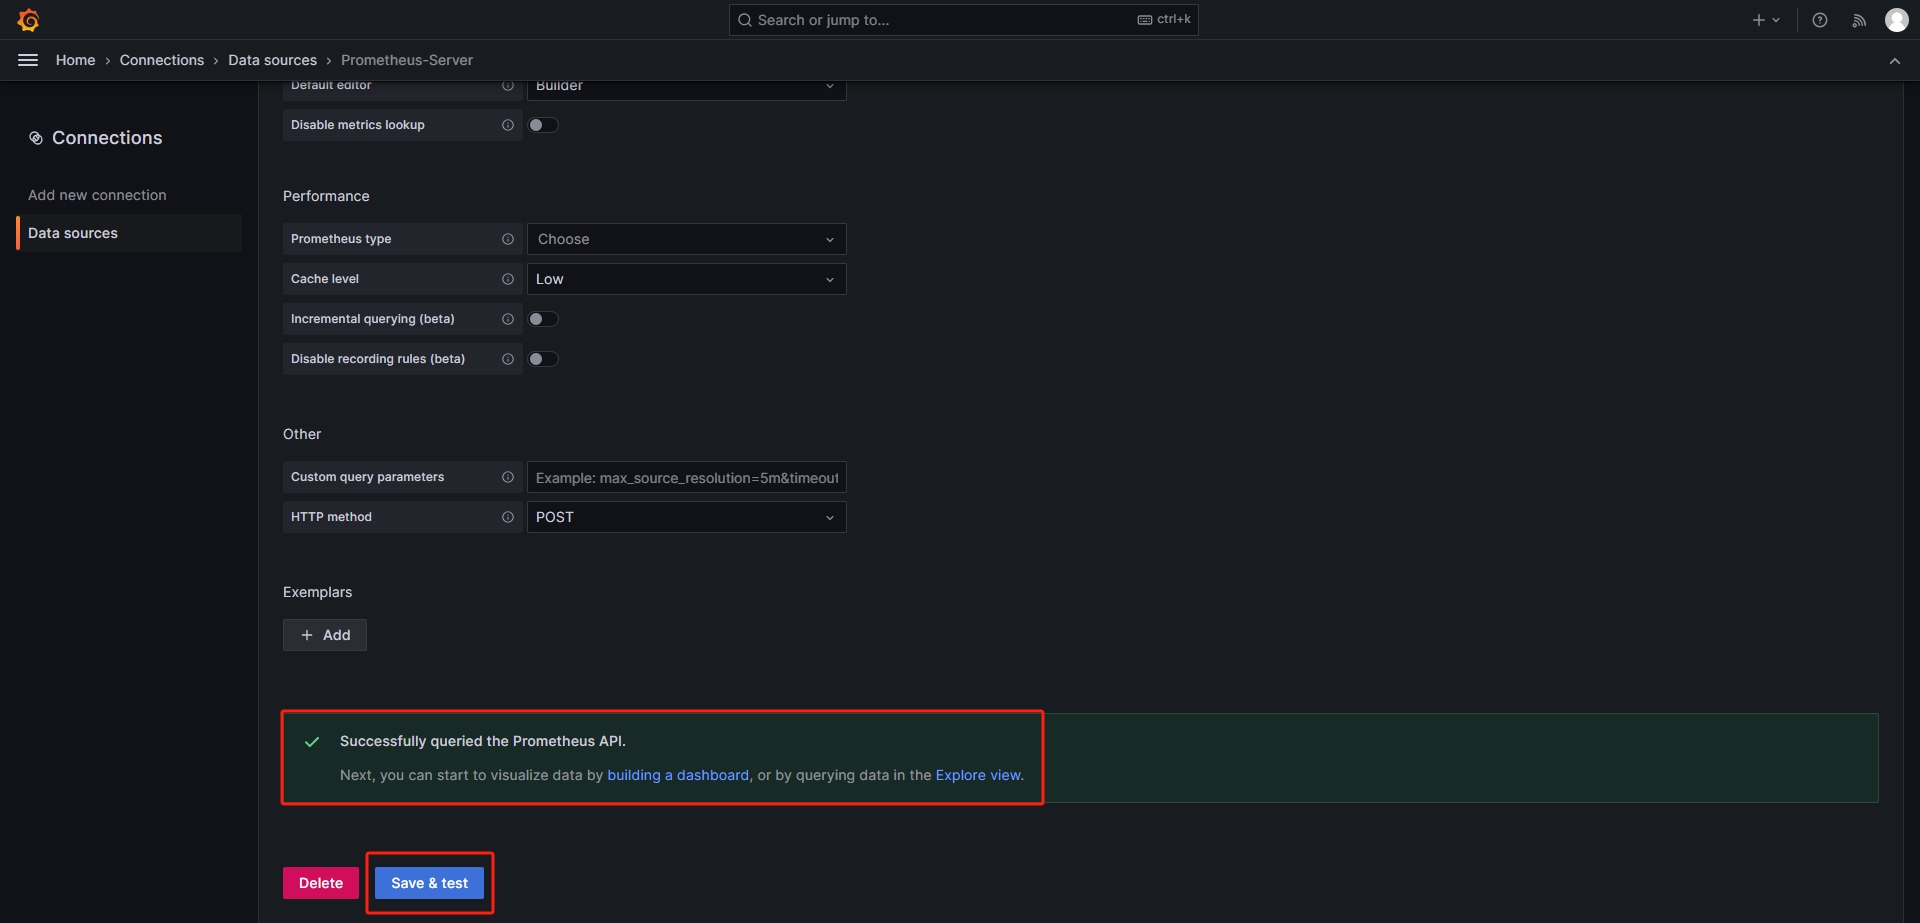
添加数据源:
路径:Home=>Connections=>Data sources=>Prometheus-Server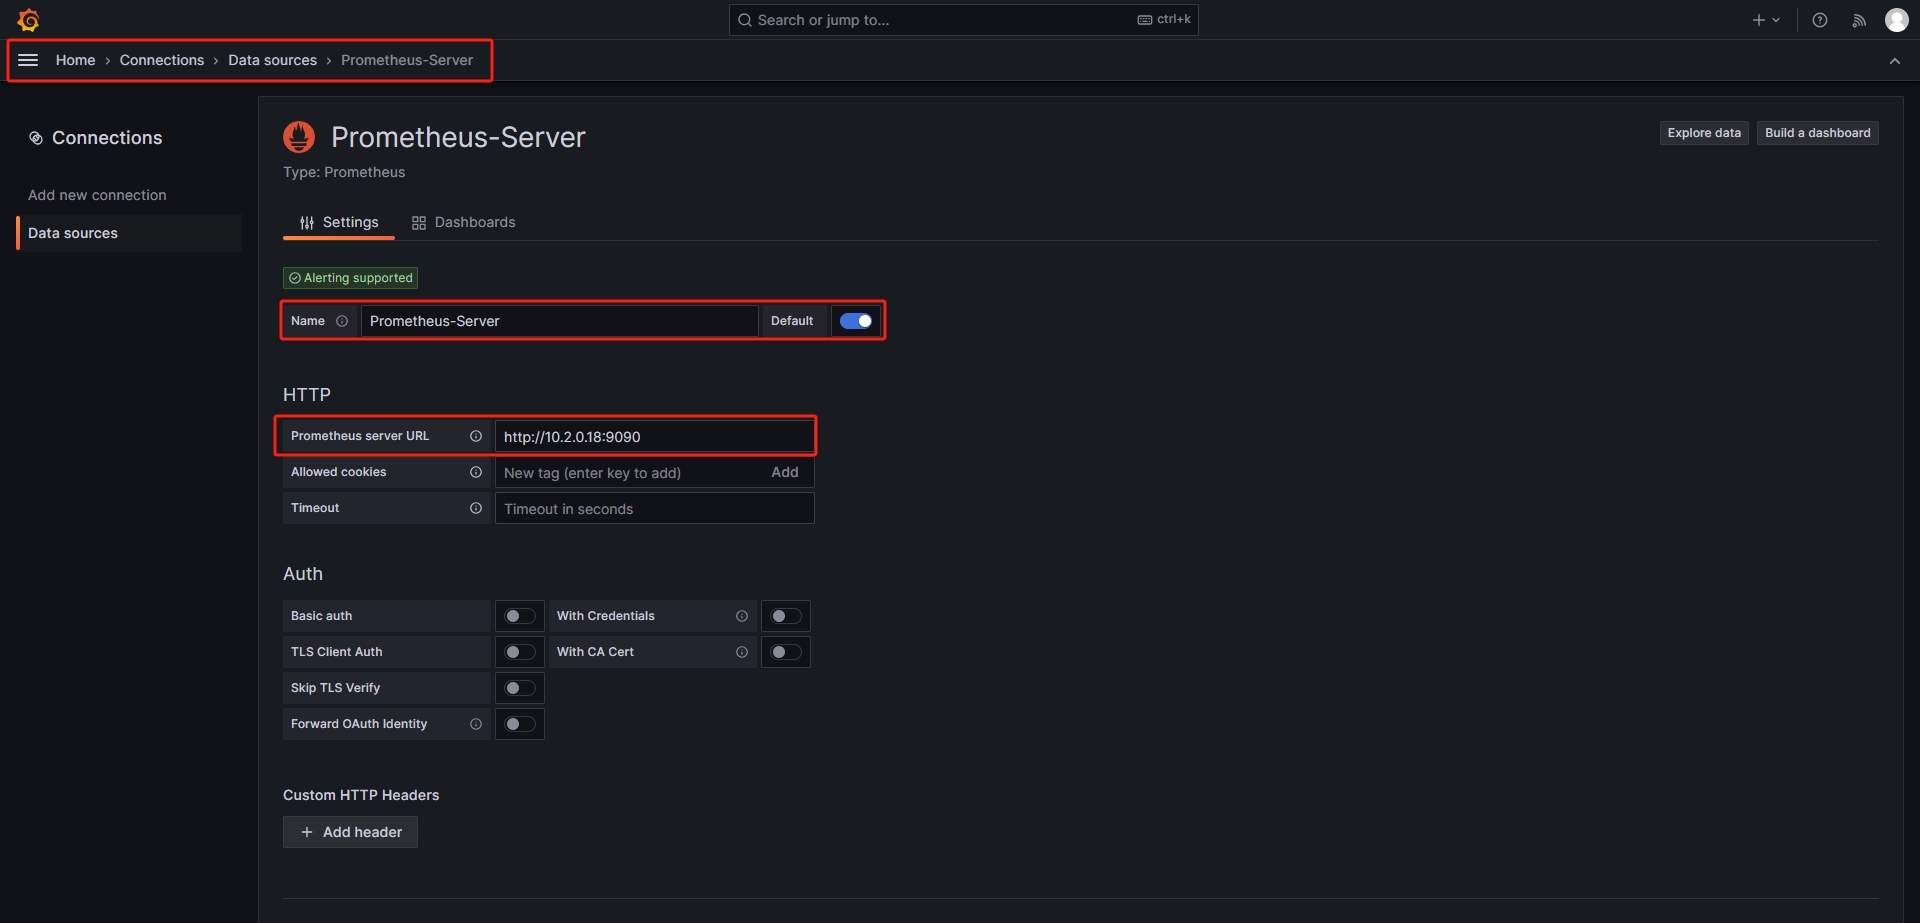
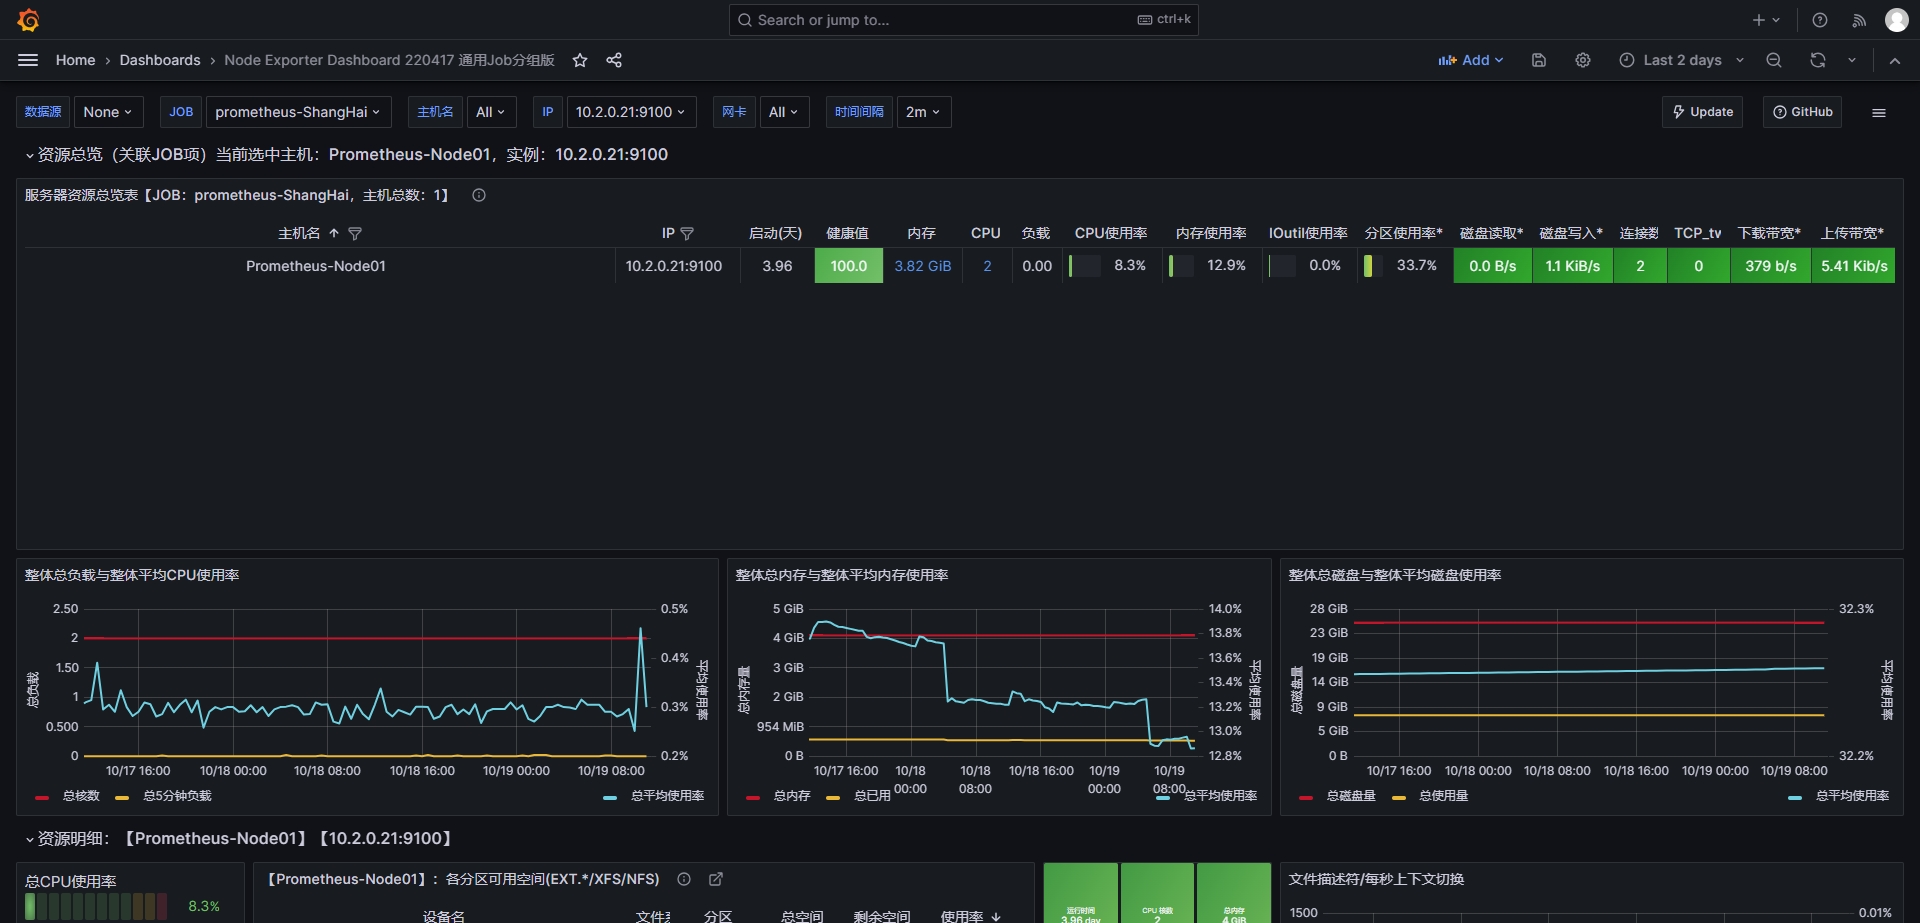
导入模板:
https://grafana.com/grafana/dashboards
路径:Home=>Dashboards=>Import dashboard 模板ID:16098
PromQL语句-指标数据、 数据类型、 匹配器;
PromQL简介:
Prometheus提供一个函数式的表达式语言PromQL (Prometheus Query Language), 可以使用户实时地查找和聚合时间序列数据, 表达式计算结果可以在图表中展示, 也可以在Prometheus表达式浏览器中以表格形式展示, 或者作为数据源, 以HTTP API的方式提供给外部系统使用。
https://prometheus.io/docs/prometheus/latest/querying/basics
PromQL查询数据类型:
Instant Vector: 瞬时向量/瞬时数据,是对目标实例查询到的同一个时间戳的一组时间序列数据(按照时间的推移对数据进存储和展示), 每个时间序列包含单个数据样本, 比如node_memory_MemFree_bytes查询的是当前剩余内存(可用内存)就是一个瞬时向量, 该表达式的返回值中只会包含该时间序列中的最新的一个样本值, 而相应的这样的表达式称之为瞬时向量表达式。
以下是查询node节点可用内存的瞬时向量表达式:
root@prometheus-server:~# curl 'http://10.2.0.18:9090/api/v1/query' --data 'query=node_memory_MemFree_bytes' --data time=1697699171

{"status":"success","data":{"resultType":"vector","result":[{"metric":{"__name__":"node_memory_MemFree_bytes","country":"中国上海","instance":"10.2.0.21:9100","job":"prometheus-ShangHai"},"value":[1697699171,"1202761728"]}]}}
Range Vector: 范围向量/范围数据,是指在任何一个时间范围内, 抓取的所有度量指标数据.比如最近一天的网卡流量趋势图、 或最近5分钟的node节点内容可用字节数等。
以下是查询node节点可用内存的范围向量表达式:
root@prometheus-server:~# curl 'http://10.2.0.18:9090/api/v1/query' --data 'query=node_memory_MemFree_bytes{instance="10.2.0.21:9100"}[5m]' --data time=1697699171

{"status":"success","data":{"resultType":"matrix","result":[{"metric":{"__name__":"node_memory_MemFree_bytes","country":"中国上海","instance":"10.2.0.21:9100","job":"prometheus-ShangHai"},"values":[[1697698872.270,"1202761728"],[1697698887.269,"1202761728"],[1697698902.270,"1202761728"],[1697698917.269,"1202761728"],[1697698932.269,"1202761728"],[1697698947.269,"1202761728"],[1697698962.269,"1202761728"],[1697698977.269,"1202761728"],[1697698992.269,"1202761728"],[1697699007.269,"1202761728"],[1697699022.269,"1202761728"],[1697699037.269,"1202761728"],[1697699052.269,"1202761728"],[1697699067.270,"1202761728"],[1697699082.269,"1202761728"],[1697699097.270,"1202761728"],[1697699112.269,"1202761728"],[1697699127.269,"1202761728"],[1697699142.269,"1202761728"],[1697699157.270,"1202761728"]]}]}}
Instant Vector(瞬时向量) VS Range Vector(范围向量):
instant vector(瞬时向量):每个指标只含有一个数据
range vector(范围向量):每个指标含有一组数据(例如指定最近几分钟的数据)

scalar: 标量/纯量数据,是一个浮点数类型的数据值, 使用node_load1获取到一个瞬时向量后, 再使用prometheus的内置函数scalar()将瞬时向量转换为标量。
例如: scalar(sum(node_load1))
root@prometheus-server:~#curl 'http://10.2.0.18:9090/api/v1/query' --data 'query=scalar(sum(node_load1{instance="10.2.0.21:9100"}))' --data time=1697699171

{"status":"success","data":{"resultType":"scalar","result":[1697699171,"0"]}}

Prometheus指标数据类型:

- Counter:计数器,Counter类型代表一个累积的指标数据, 在没有被重启的前提下只增不减(生活中的电表、 水表), 比如磁盘I/O总数、 Nginx/API的请求总
数、 网卡流经的报文总数等。 - Gauge:仪表盘,Gauge类型代表一个可以任意变化的指标数据, 值可以随时增高或减少, 如带宽速率、 CPU负载、 内存利用率、 nginx 活动连接数等。
- Histogram: 累积直方图, Histogram会在一段时间范围内对数据进行采样(通常是请求持续时间或响应大小等),假如每分钟产生一个当前的活跃连接数, 那么一天24小时*60分钟=1440分钟就会产生1440个数据, 查看数据的每间隔的绘图跨度为2小时, 那么2点的柱状图(bucket)会包含0点到2点即两个小时的数据, 而4点的柱状图(bucket)则会包含0点到4点的数据, 而6点的柱状图(bucket)则会包含0点到6点的数据, 可用于统计从当天零点开始到当前时间的数据统计结果, 如http请求成功率、 丢包率等, 比如ELK的当天访问IP统计。
- Summary: 摘要图, 也是一组数据, 默认统计选中的指标的最近10分钟内的数据的分位数, 可以指定数据统计时间范围, 基于分位数(Quantile),亦称分位
点,是指用分割点(cut point)将随机数据统计并划分为几个具有相同概率的连续区间, 常见的为四分位, 四分位数是将数据样本统计后分成四个区间, 将范围内的数据进行百分比的占比统计,从0到1, 表示是0%~100%, (0%~25%,%25~50%,50%~75%,75%~100%),利用四分位数, 可以快速了解数据的大概统计结果。
node-exporter指标数据格式:
没有标签的
#metric_name metric_value
# TYPE node_load15 gauge
node_load15 0.1
一个标签的
#metric_name{label1_name="label1-value"} metric_value
# TYPE node_network_receive_bytes_total counter
node_network_receive_bytes_total{device="eth0"} 1.44096e+07
多个标签的
#metric_name{label1_name="label1-value","labelN_name="labelN-value} metric_value
# TYPE node_filesystem_files_free gauge
node_filesystem_files_free{device="/dev/sda2",fstype="xfs",mountpoint="/boot"} 523984
PromQL查询指标数据示例:
- node_memory_MemTotal_bytes #查询node节点总内存大小
- node_memory_MemFree_bytes #查询node节点剩余可用内存
- node_memory_MemTotal_bytes{instance="10.2.0.21:9100"} #基于标签查询指定节点的总内存
- node_memory_MemFree_bytes{instance="10.2.0.21:9100"} #基于标签查询指定节点的可用内存
- node_disk_io_time_seconds_total{device="sda"} #查询指定磁盘的每秒磁盘io
- node_filesystem_free_bytes{device="/dev/sda1",fstype="xfs",mountpoint="/"} #查看指定磁盘的磁盘剩余空间
基于标签对指标数据进行匹配:
- = :选择与提供的字符串完全相同的标签, 精确匹配。
- != :选择与提供的字符串不相同的标签, 取反。
- =~ :选择正则表达式与提供的字符串( 或子字符串) 相匹配的标签。
- !~ :选择正则表达式与提供的字符串( 或子字符串) 不匹配的标签。
查询格式<metric name>{<label name>=<label value>, ...}
node_load1{instance="10.2.0.21:9100"}
node_load1{country="中国上海"}
node_load1{country="中国上海", instance="10.2.0.21:9100"} #精确匹配
node_load1{country="中国上海",instance!="10.2.0.21:9100"} #取反
node_load1{instance=~"10.2.0.2.*:9100$"} #包含正则且匹配
node_load1{instance!~"10.2.0.21:9100"} #包含正则且取反

PromQL语句-时间范围、 运算符、 聚合运算及示例;
对指标数据进行时间范围指定:
- s - 秒
- m - 分钟
- h - 小时
- d - 天
- w - 周
- y - 年
瞬时向量表达式, 选择当前最新的数据
node_memory_MemTotal_bytes{}区间向量表达式, 选择以当前时间为基准, 查询所有节点node_memory_MemTotal_bytes指标5分钟内的数据
node_memory_MemTotal_bytes{}[5m]区间向量表达式, 选择以当前时间为基准, 查询指定节点node_memory_MemTotal_bytes指标5分钟内的数据
node_memory_MemTotal_bytes{instance="172.31.1.181:9100"}[5m]PromQL 运算符:
对指标数据进行数学运算:
+ 加法
- 减法
* 乘法
/ 除法
% 模
^ 幂(N次方)
node_memory_MemFree_bytes/1024/1024 #将内存进行单位从字节转行为兆
node_disk_read_bytes_total{device="sda"} + node_disk_written_bytes_total{device="sda"} #计算磁盘读写数据量
(node_disk_read_bytes_total{device="sda"} + node_disk_written_bytes_total{device="sda"}) / 1024 / 1024 #单位转换

对指标数据进行进行聚合运算:
- max() #最大值
- min() #最小值
- avg() #平均值
计算每个节点的最大的流量值:
max(node_network_receive_bytes_total) by (instance)计算每个节点最近五分钟每个device的最大流量
max(rate(node_network_receive_bytes_total[5m])) by (device)
sum() #求数据值相加的和(总数)
sum(prometheus_http_requests_total)
{} 2495
最近总共请求数为2495次, 用于计算返回值的总数(如http请求次数)
count() #统计返回值的条数
count(node_os_version)
{} 3
一共两条返回的数据, 可以用于统计节点数、 pod数量等
count_values() #对value的个数(行数)进行计数,并将value赋值给自定义标签, 从而成为新的label
count_values("node_version",node_os_version) #统计不同的系统版本节点有多少
{node_version="22.04"} 3
abs() #返回指标数据的值
abs(sum(prometheus_http_requests_total{handler="/metrics"}))absent() #如果监指标有数据就返回空, 如果监控项没有数据就返回1, 可用于对监控项设置告警通知(如果返回值等于1就触发告警通知)
absent(sum(prometheus_http_requests_total{handler="/metrics"}))stddev() #标准差
stddev(prometheus_http_requests_total) #5+5=10,1+9=10,1+9这一组的数据差异就大, 在系统是数据波动较大, 不稳定stdvar() #求方差
stdvar(prometheus_http_requests_total)topk() #样本值排名最大的N个数据
举例取从大到小的前6个
topk(6, prometheus_http_requests_total)bottomk() #样本值排名最小的N个数据
举例取从小到大的前6个
bottomk(6, prometheus_http_requests_total)rate()
rate函数是专门搭配counter数据类型使用函数, rate会取指定时间范围内所有数据点, 算出一组速率, 然后取平均值作为结果,适合用于计算数据相对平稳的数据。
rate(prometheus_http_requests_total[5m])
rate(apiserver_request_total{code=~"^(?:2..)$"}[5m])
rate(node_network_receive_bytes_total[5m])
irate()
函数也是专门搭配counter数据类型使用函数,irate取的是在指定时间范围内的最近两个数据点来算速率,适合计算数据变化比较大的数据,显示的数据相对比较准确,所以官网文档说:irate适合快速变化的计数器(counter),而rate适合缓慢变化的计数器(counter)。
irate(prometheus_http_requests_total[5m])
irate(node_network_receive_bytes_total[5m])
irate(apiserver_request_total{code=~"^(?:2..)$"}[5m])
by
在计算结果中, 只保留by指定的标签的值, 并移除其它所有的
sum(rate(node_network_receive_packets_total{instance=~".*"}[10m])) by (instance)
sum(rate(node_memory_MemFree_bytes[5m])) by (increase)
without, 从计算结果中移除列举的instance,job标签, 保留其它标签
sum(prometheus_http_requests_total) without (instance,job)Prometheus pushgateway:
Pushgateway 简介:
- pushgateway用于临时的指标数据收集。
- pushgateway不支持数据拉取(pull模式), 需要客户端主动将数据推送给pushgateway。
- pushgateway可以单独运行在一个节点, 然后需要自定义监控脚本把需要监控的主动推送给pushgateway的API接口, 然后pushgateway再等待prometheus server抓取数据, 即pushgateway本身没有任何抓取监控数据的功能,目前pushgateway只能被动的等待数据从客户端进行推送。
- --persistence.file="" #数据保存的文件, 默认只保存在内存中
- --persistence.interval=5m #数据持久化的间隔时间
客户端推送单条指标数据和Pushgateway 数据采集流程:
要手动Push数据到 PushGateway中, 可以通过其提供的 API 标准接口来添加, 默认 URL 地址为:http://<;ip>:9091/metrics/job/<JOBNAME{/<LABEL_NAME>/<LABEL_VALUE>}
<JOBNAME>是必填项,是job的名称,后边可以跟任意数量的标签对,一般会添加一个instance/<INSTANCE_NAME>实例名称标签, 来方便区分各个指标是在哪个节点产生的。
如下推送一个job名称为mytest_job, key为mytest_metric值为2022
echo "mytest_metric 2088" | curl --data-binary @- http://10.2.0.24:9091/metrics/job/mytest_job
部署Pushgateway:
root@prometheus-pushgateway:/apps# tar xvf pushgateway-1.6.2.linux-amd64.tar.gz
root@prometheus-pushgateway:/apps# ln -sv /apps/pushgateway-1.6.2.linux-amd64 /apps/pushgateway
root@prometheus-pushgateway:/apps# cat /etc/systemd/system/pushgateway.service
[Unit]
Description=Prometheus pushgateway
After=network.target

[Service]
ExecStart=/apps/pushgateway/pushgateway

[Install]
WantedBy=multi-user.target

root@prometheus-pushgateway:/apps/pushgateway# systemctl daemon-reload && systemctl start pushgateway && systemctl enable pushgateway
验证Pushgateway:
默认监听在9091端口,可以通过http://10.2.0.24:9091/metrics对外提供指标数据抓取接口
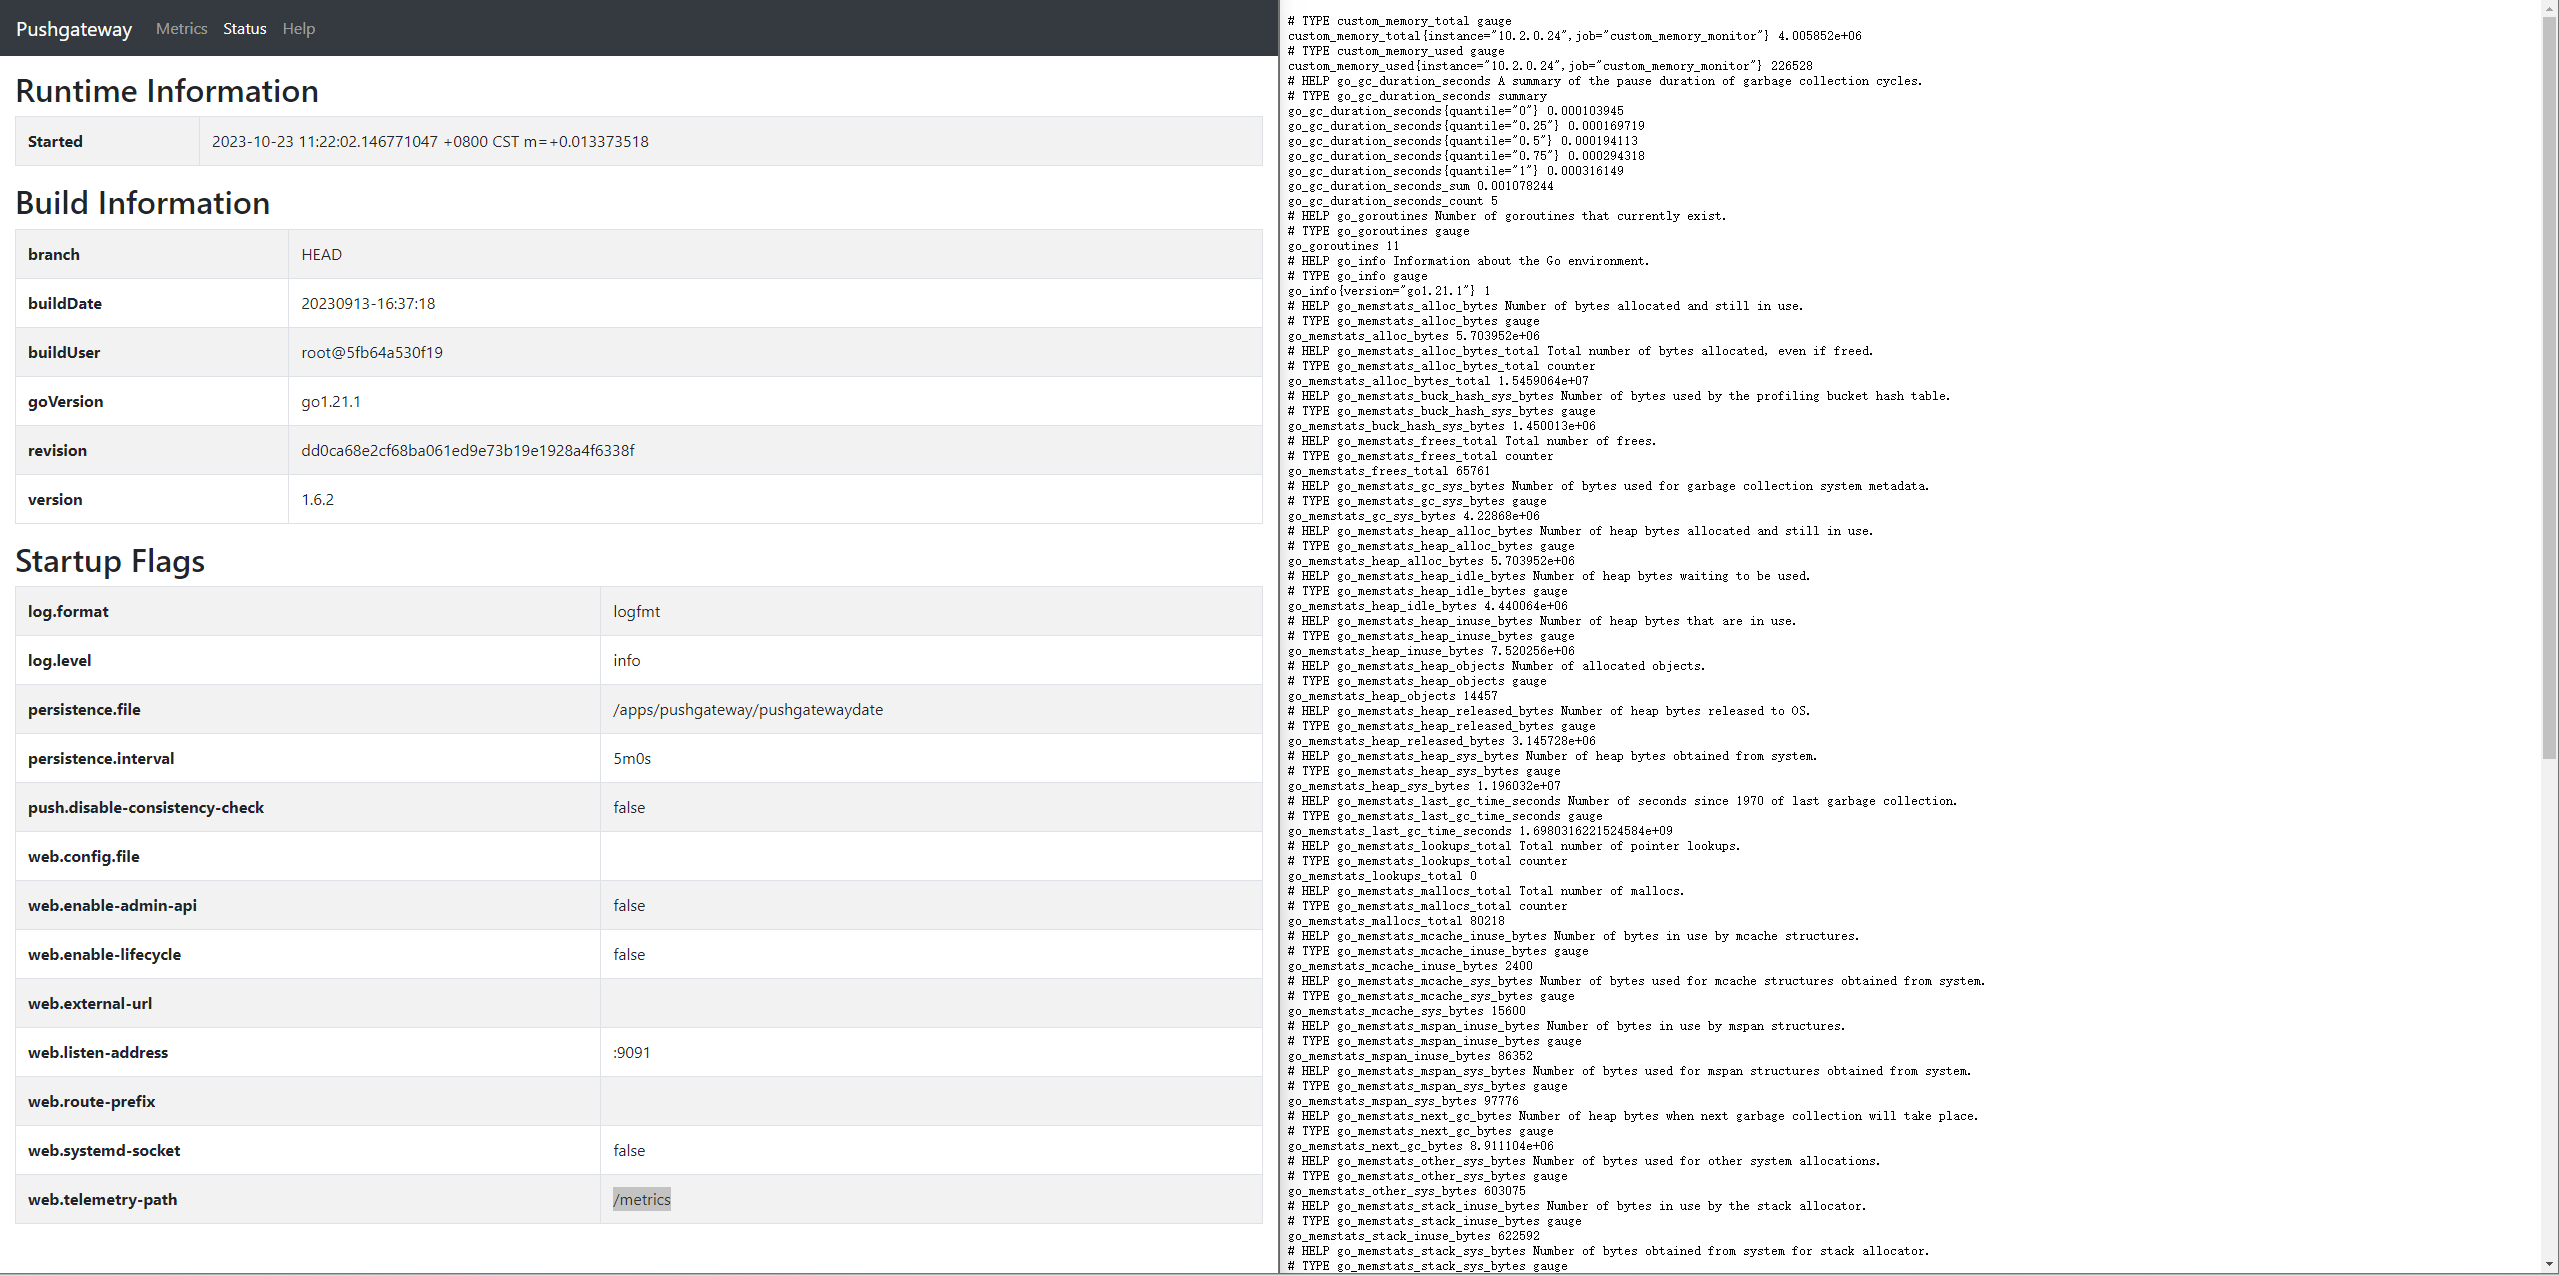
除了我们手动push的指标数据自身以外, pushgateway还为每一条指标数据附加了push_time_seconds 和 push_failure_time_seconds 两个指标,这两个是 PushGateway 自动生成的, 分别用于记录指标数据的成功上传时间和失败上传时间。
配置Prometheus-server数据采集:
root@prometheus-server:/apps/prometheus# vim prometheus.yml
- job_name: 'prometheus-pushgateway'
  scrape_interval: 5s
  honor_labels: true
  static_configs:
    - targets: ['10.2.0.24:9091']
root@prometheus-server1:/apps/prometheus# systemctl restart prometheus.service
prometheus-server 验证指标数据:

客户端推送多条数据-方式一:
root@prometheus-node1:~# cat <<EOF | curl --data-binary @- http://10.2.0.24:9091/metrics/job/test_job/instance/10.2.0.24
#TYPE node_memory_usage gauge
node_memory_usage 4311744512
# TYPE memory_total gauge
node_memory_total 103481868288
EOF
客户端推送多条数据-方式二:
基于自定义脚本实现数据的收集和推送:
root@prometheus-node1:~# cat memory_monitor.sh
#!/bin/bash
total_memory=$(free |awk '/Mem/{print $2}')
used_memory=$(free |awk '/Mem/{print $3}')
job_name="custom_memory_monitor"
instance_name=`ifconfig eth0 | grep -w inet | awk '{print $2}'`
pushgateway_server="http://10.2.0.24:9091/metrics/job"
cat <<EOF | curl --data-binary @- ${pushgateway_server}/${job_name}/instance/${instance_name}
#TYPE custom_memory_total gauge
custom_memory_total $total_memory
#TYPE custom_memory_used gauge
custom_memory_used $used_memory
EOF
分别在不同主机执行脚本, 验证指标数据收集和推送:
root@prometheus-node1:~# bash memory_monitor.sh
root@prometheus-node2:~# bash memory_monitor.sh
验证prometheus-server能否抓取pushgateway的数据:

Pushgateway指标数的删除:
1、通过API删除:
root@prometheus-node2:~# curl -X DELETE http://10.2.0.24:9091/metrics/job/custom_memory_monitor/instance/10.2.0.242、通过控制台删除
Prometheus Federation(联邦集群):
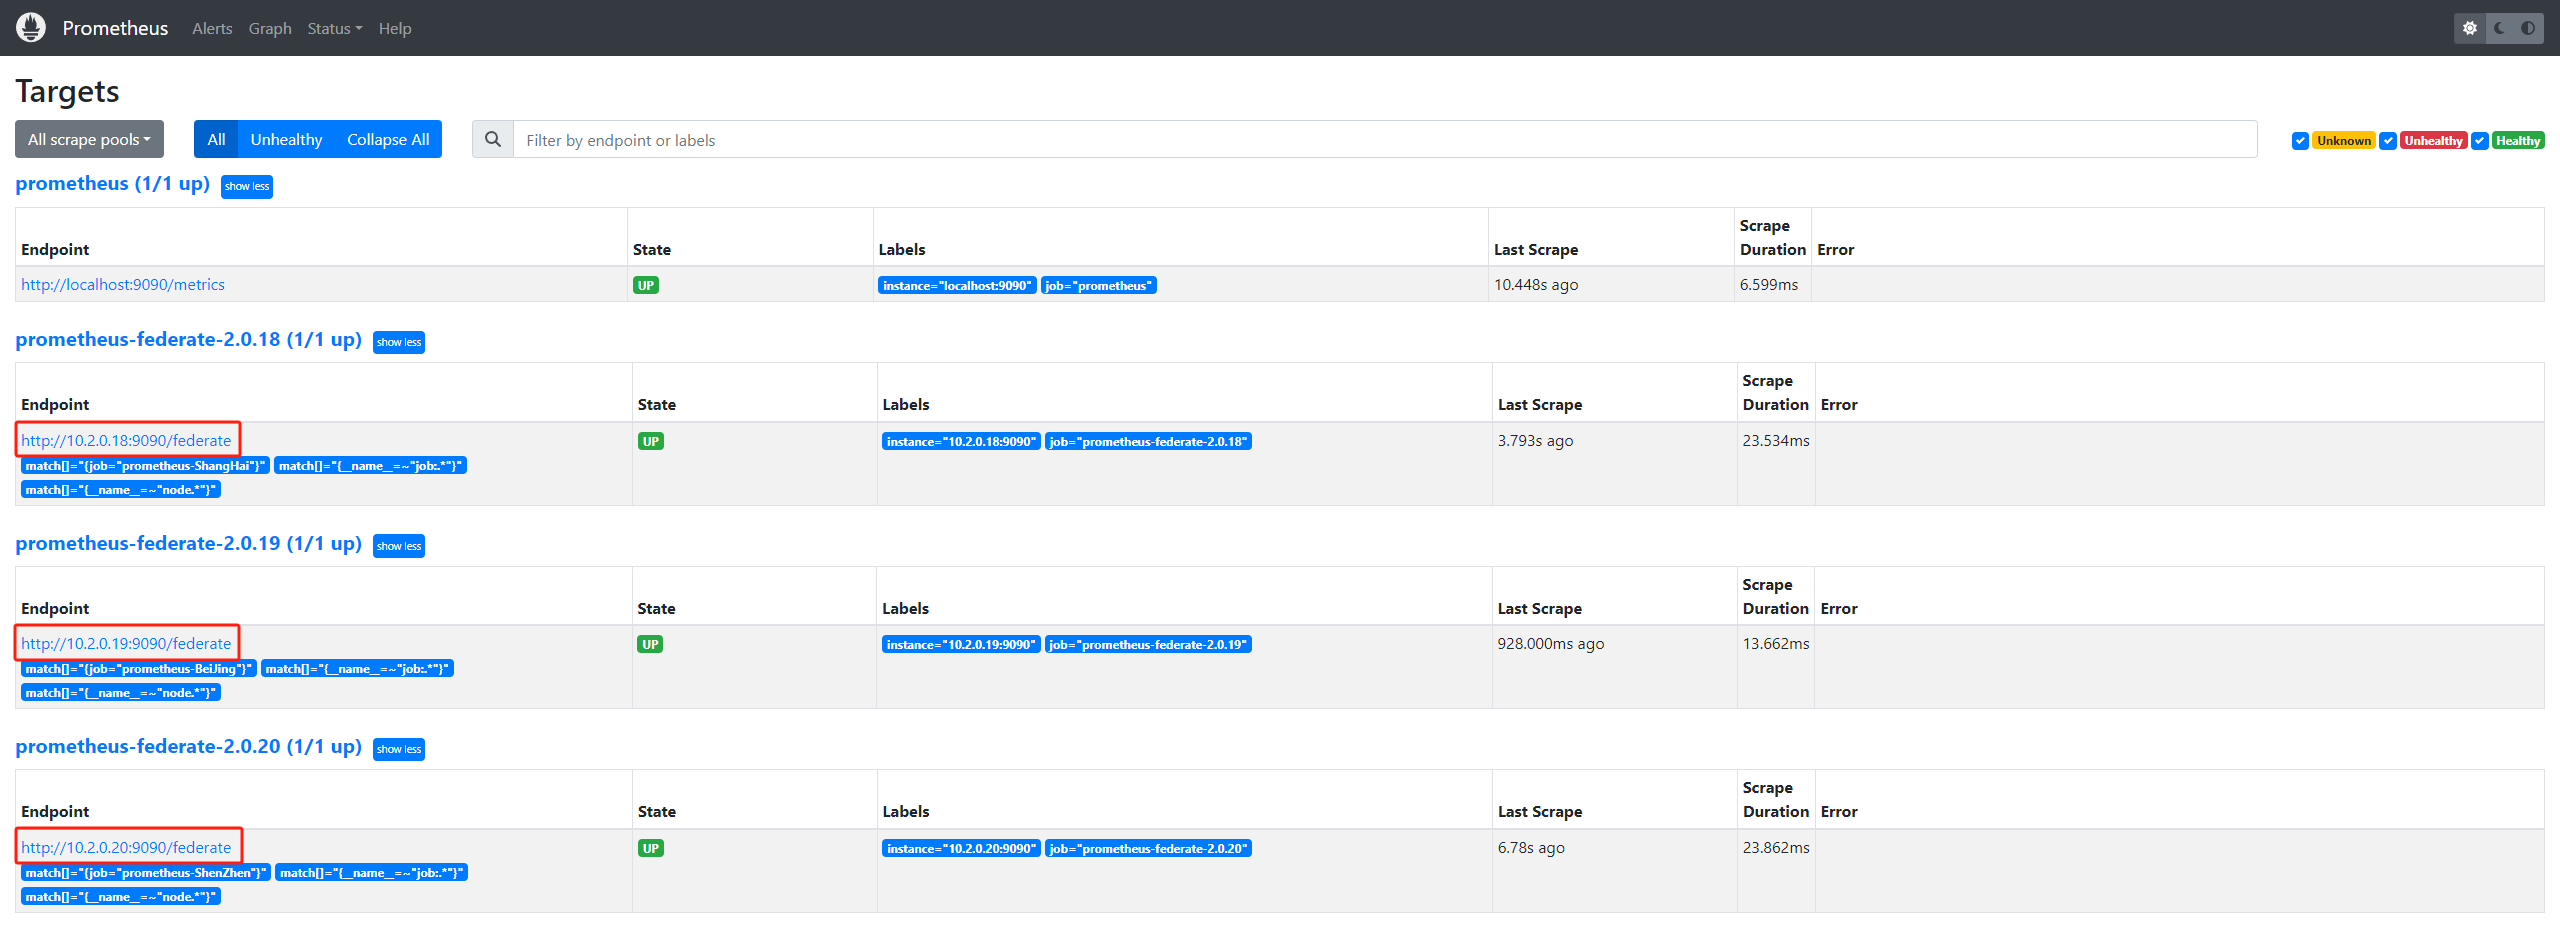
10.2.0.18收集10.5.0.21(ShangHai)节点数据,10.2.0.19收集10.2.0.22(BeiJing)节点数据,10.2.0.20收集10.2.0.23(ShenZhen)数据。10.2.0.17通过联邦模式(/federate)抓取三个Server抓取到的指标也就是ShangHai,BeiJing,ShenZhen三个node节点的指标信息。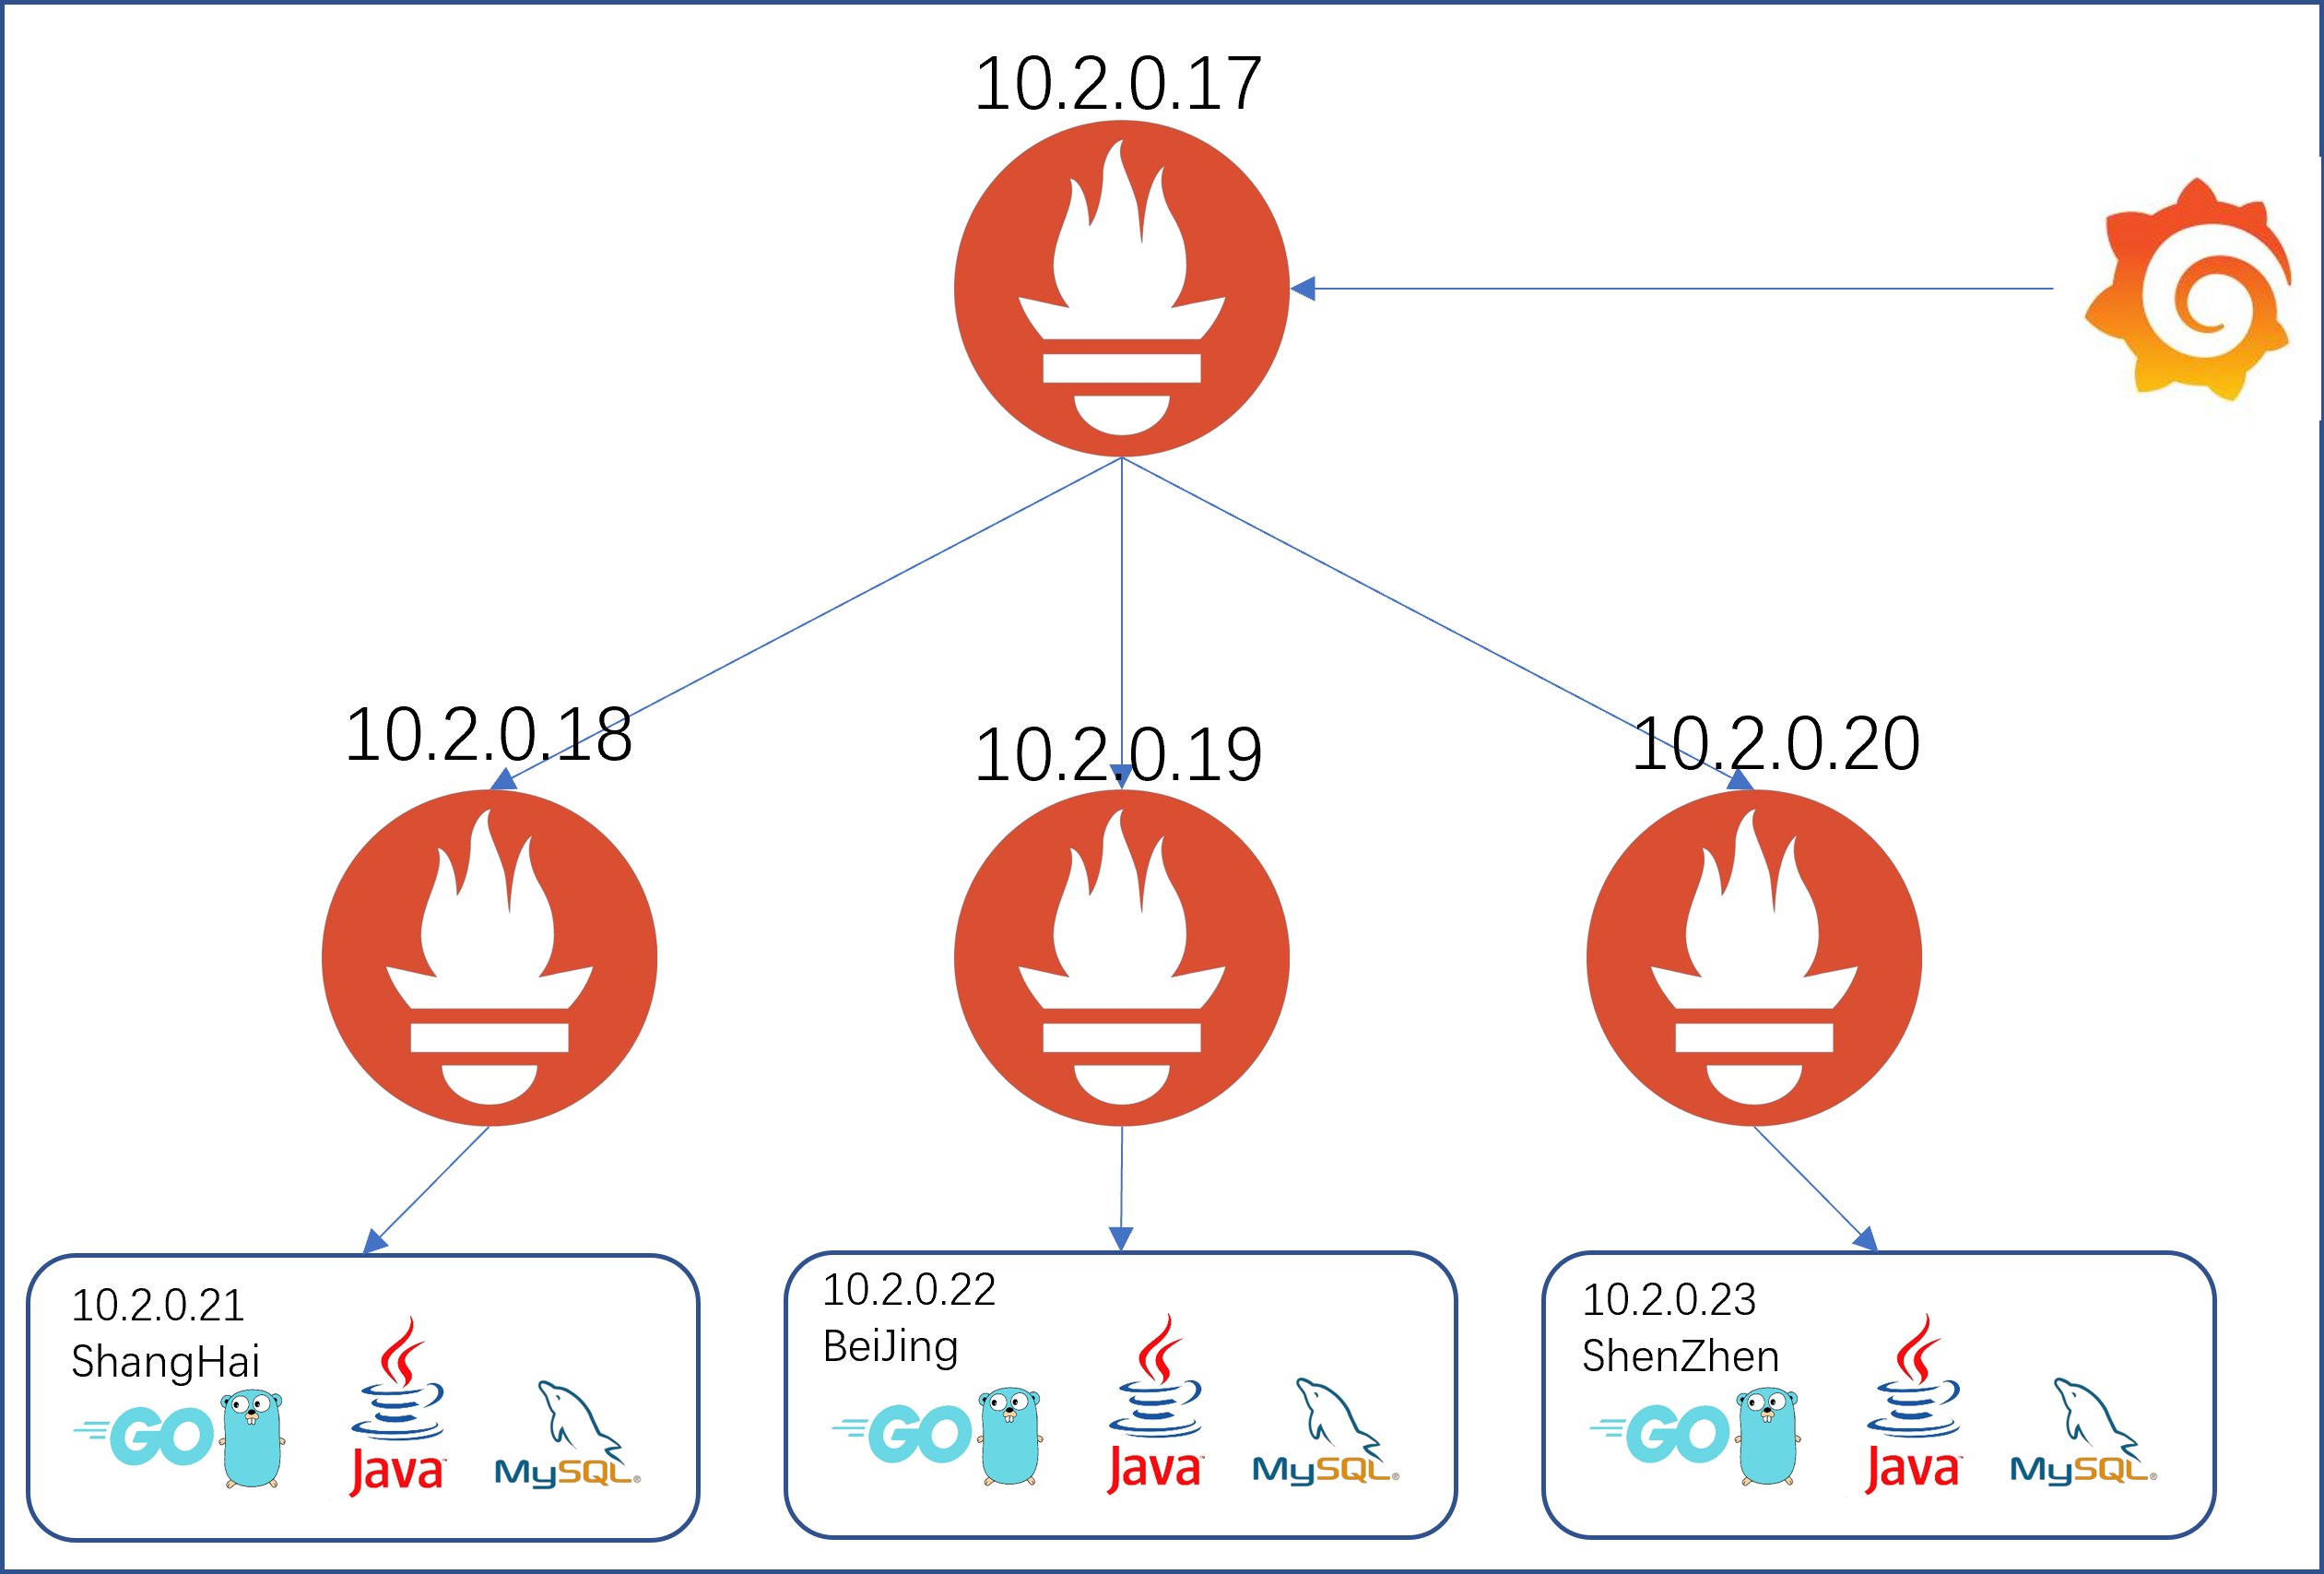
部署Prometheus Server和node_exporter的步骤
上方有,在此就不做过多介绍,详情请查看上方二进制安装
配置Prometheus(10.2.0.17)联邦节点收集node-exporter指标数据:
- job_name: 'prometheus-federate-2.0.18'
    scrape_interval: 10s
    honor_labels: true
    metrics_path: '/federate'
    params:
    'match[]':
    - '{job="prometheus-ShangHai"}'
    - '{__name__=~"job:.*"}'
    - '{__name__=~"node.*"}'
    static_configs:
    - targets:
    - '10.2.0.18:9090'
- job_name: 'prometheus-federate-2.0.19'
    scrape_interval: 10s
    honor_labels: true
    metrics_path: '/federate'
    params:
    'match[]':
    - '{job="prometheus-BeiJing"}'
    - '{__name__=~"job:.*"}'
    - '{__name__=~"node.*"}'
    static_configs:
    - targets:
    - '10.2.0.19:9090'
- job_name: 'prometheus-federate-2.0.20'
    scrape_interval: 10s
    honor_labels: true
    metrics_path: '/federate'
    params:
    'match[]':
    - '{job="prometheus-ShenZhen"}'
    - '{__name__=~"job:.*"}'
    - '{__name__=~"node.*"}'
    static_configs:
    - targets:
    - '10.2.0.20:9090'
root@prometheus-server3:/apps/prometheus# systemctl restart prometheus.service
验证prometheus targets状态:
验证prometheus 通过联邦节点收集的node-exporter指标数据:


仅登录用户可评论,点击 登录