使用TEI部署模型
安装 Rust
建议安装 Rust 的最新版本 1.75.0,安装命令如下
curl --proto '=https' --tlsv1.2 -sSf https://sh.rustup.rs | shTEI 的安装
1、下载 TEI 的 github 仓库
git clone https://github.com/huggingface/text-embeddings-inference.git && cd text--embeddings-inference2、安装cargo install时所用依赖
root@localhost:~/BAAI/text-embeddings-inference-1.5.0# apt install pkg-config libssl-dev3、gcc g++ 的版本要>=12
ubuntu 20.04中apt的gcc和g++最高版本为9,所以采用下下策,编译安装gcc和g++
# 下载 GCC 源码
root@localhost:~/BAAI/text-embeddings-inference-1.5.0# wget http://ftp.gnu.org/gnu/gcc/gcc-12.2.0/gcc-12.2.0.tar.gz
root@localhost:~/BAAI/text-embeddings-inference-1.5.0# tar -xzf gcc-12.2.0.tar.gz
root@localhost:~/BAAI/text-embeddings-inference-1.5.0# cd gcc-12.2.0

# 安装依赖
root@localhost:~/BAAI/text-embeddings-inference-1.5.0# sudo apt install build-essential libgmp3-dev libmpfr-dev libmpc-dev

# 配置和编译
root@localhost:~/BAAI/text-embeddings-inference-1.5.0# ./configure --disable-multilib --enable-languages=c,c++
root@localhost:~/BAAI/text-embeddings-inference-1.5.0# make -j$(nproc)
root@localhost:~/BAAI/text-embeddings-inference-1.5.0# sudo make install

#验证是否编译成功
root@localhost:~/BAAI/text-embeddings-inference-1.5.0# /usr/local/bin/gcc --version
gcc (GCC) 12.2.0
Copyright (C) 2022 Free Software Foundation, Inc.
This is free software; see the source for copying conditions.  There is NO
warranty; not even for MERCHANTABILITY or FITNESS FOR A PARTICULAR PURPOSE.

root@localhost:~/BAAI/text-embeddings-inference-1.5.0# /usr/local/bin/g++ --version
g++ (GCC) 12.2.0
Copyright (C) 2022 Free Software Foundation, Inc.
This is free software; see the source for copying conditions.  There is NO
warranty; not even for MERCHANTABILITY or FITNESS FOR A PARTICULAR PURPOSE.
4、设置环境变量
export CC=/usr/local/bin/gcc
export CXX=/usr/local/bin/g++
export CARGO_TARGET_DIR=/root/BAAI/text-embeddings-inference-1.5.0/target
5、安装TEI 项目相关依赖
ln -sf /root/.cargo/bin/cargo /usr/bin/
cargo install --path router -F candle
6、部署 Rerank 模型
ln -sf /root/.cargo/bin/text-embeddings-router /usr/bin/
nohup text-embeddings-router --model-id BAAI/bge-reranker-v2-m3 --port 38080 > output.log 2>&1 &
部署完成后查看API相关信息
http://10.84.3.243:38080/docs/测试
curl -X 'POST' \
  'http://localhost:38080/rerank' \
  -H 'accept: application/json' \
  -H 'Content-Type: application/json' \
  -d '{
  "query": "What is Deep Learning?",
  "texts": [
    "Deep Learning is ...",
    "hello"
  ]
}'
7、部署Embedding 模型
nohup text-embeddings-router --model-id BAAI/bge-m3 --port 38081 > output.log 2>&1 &8、部署chat模型
nohup text-embeddings-router Qwen/Qwen2.5-72B-Instruct --port 38082 > output.log 2>&1 &使用ollama安装chat模型
1、一键安装ollama
curl -fsSL https://ollama.com/install.sh | sh2、手动安装ollama
2.1、下载并解压安装包
curl -L https://ollama.com/download/ollama-linux-amd64.tgz -o ollama-linux-amd64.tgz
sudo tar -C /usr -xzf ollama-linux-amd64.tgz
2.2、创建启动用户
sudo useradd -r -s /bin/false -U -m -d /usr/share/ollama ollama
sudo usermod -a -G ollama $(whoami)
2.3、加入systemd管理
cat > /etc/systemd/system/ollama.service << EOF
[Unit]
Description=Ollama Service
After=network-online.target

[Service]
ExecStart=/usr/bin/ollama serve
User=ollama
Group=ollama
Restart=always
RestartSec=3
Environment="PATH=$PATH"

[Install]
WantedBy=default.target
EOF
2.4、启动服务
sudo systemctl daemon-reload
sudo systemctl enable ollama
2.5、部署qwen2.5:72b
ollama run qwen2.5:72b3、Kubernetes中使用ollama部署Chat模型
3.1、ollama的deployment 文件
必须事先在 Kubernetes 中开启 GPU 支持
apiVersion: v1
kind: PersistentVolumeClaim
metadata:
  name: ollama-pvc
spec:
  accessModes:
    - ReadWriteMany
  resources:
    requests:
      storage: 50Gi
  storageClassName: csi-cephfs-sc
---
apiVersion: apps/v1
kind: Deployment
metadata:
  name: ollama
spec:
  replicas: 1
  selector:
    matchLabels:
      app: ollama
  template:
    metadata:
      labels:
        app: ollama
    spec:
      containers:
      - name: ollama
        image: registry.cn-shanghai.aliyuncs.com/qwx_images/ollama:0.4.7
        resources:
          limits:
            nvidia.com/gpu: '2'
        ports:
        - containerPort: 11434
        #stdin: true
        #tty: true
        #securityContext:
        #  privileged: true
        volumeMounts:
        - name: ollama-volume
          mountPath: /root/.ollama
      volumes:
      - name: ollama-volume
        persistentVolumeClaim:
          claimName: ollama-pvc
---
apiVersion: v1
kind: Service
metadata:
  name: ollama-service
spec:
  selector:
    app: ollama
  ports:
    - protocol: TCP
      port: 11434
      targetPort: 11434
  type: ClusterIP
3.2部署nvidia/Llama-3.1-Nemotron-70B-Instruct模型
root@master3:~# kubectl exec -it ollama-7bcbd9d78f-dkd6g -n ollama -- ollama run nemotron
pulling manifest
pulling c147388e9931... 100% ▕████████████████████████████████████████████████████████████████████████████████████████████████████████████████████42 GB
pulling 4863fe3335f3... 100% ▕████████████████████████████████████████████████████████████████████████████████████████████████████████████████████1.2 KB
pulling 64e1b2889b78... 100% ▕████████████████████████████████████████████████████████████████████████████████████████████████████████████████████▏ 7.6 KB
pulling a568f2ebc73c... 100% ▕████████████████████████████████████████████████████████████████████████████████████████████████████████████████████▏ 4.7 KB
pulling 56bb8bd477a5... 100% ▕████████████████████████████████████████████████████████████████████████████████████████████████████████████████████▏   96 B
pulling 2b4e98e1c22e... 100% ▕████████████████████████████████████████████████████████████████████████████████████████████████████████████████████▏  562 B
verifying sha256 digest
writing manifest
success
>>> #此处可以与其对话,Ctrl+d 退出 进程后台运行
Xinference
Xorbits Inference (Xinference) 是一个开源平台,用于简化各种 AI 模型的运行和集成。借助 Xinference,您可以使用任何开源 LLM、嵌入模型和多模态模型在云端或本地环境中运行推理,并创建强大的 AI 应用。
官方网站:https://inference.readthedocs.io/zh-cn/latest/getting_started/installation.html
pip
Xinference 在 Linux, Windows, MacOS 上都可以通过 pip 来安装。如果需要使用 Xinference 进行模型推理,可以根据不同的模型指定不同的引擎。
1、先安装llama-cpp-pytho
wget https://github.com/abetlen/llama-cpp-python/releases/download/v0.3.4-cu124/llama_cpp_python-0.3.4-cp310-cp310-linux_x86_64.whl && pip install llama_cpp_python-0.3.4-cp310-cp310-linux_x86_64.whl2、用以下命令安装所有需要的依赖:
pip install "xinference[all]"3、设置用 systemctl 管理Xinference
root@server1:~# cat /etc/systemd/system/xinference.service
[Unit]
Description=XInference Local Service
After=network.target

[Service]
Type=simple
ExecStart=/anaconda/envs/Xinference/bin/xinference-local --host 0.0.0.0 --port 9997 --auth-config /xinference/auth.json

Restart=on-failure

[Install]
WantedBy=multi-user.target
4、启动Xinference
systemctl daemon-reload && systemctl start xinference.service && systemctl enable xinference.service5、验证部署是否成功
6、日志存放PATH
(Xinference) root@server1:~# tree .xinference/
.xinference/
└── logs
    ├── local_1734051023189
    │   └── xinference.log
    ├── local_1734051690172
    │   └── xinference.log
    ├── local_1734051991540
    │   └── xinference.log
    └── local_1734052520276
        └── xinference.log

5 directories, 4 files
Docker
部署CPU版Xinference Server
services:
  xinference:
    image: registry.cn-hangzhou.aliyuncs.com/xprobe_xinference/xinference:v0.16.2-cpu
    ports:
      - "9997:9997"
    environment:
      - XINFERENCE_MODEL_SRC=modelscope  #指定模型仓库,国内的是魔塔库,国外的是huggingface
    command: xinference-local -H 0.0.0.0 --log-level debug
部署GPU版Xinference
准备工作
Xinference 使用 GPU 加速推理,该镜像需要在有 GPU 显卡并且安装 CUDA 的机器上运行。
保证 CUDA 在机器上正确安装。可以使用 nvidia-smi 检查是否正确运行。
镜像中的 CUDA 版本为 12.4 。为了不出现预期之外的问题,请将宿主机的 CUDA 版本和 NVIDIA Driver 版本分别升级到 12.4 和 550 以上。
services:
  xinference:
    image: registry.cn-hangzhou.aliyuncs.com/xprobe_xinference/xinference:v0.16.2
    environment:
      - XINFERENCE_MODEL_SRC=modelscope
    ports:
      - "9998:9997"
    runtime: nvidia
    command: xinference-local -H 0.0.0.0 --log-level debug
    deploy:
      resources:
        limits:
          devices:
            - driver: nvidia
              count: all
    restart: always
Kubernetes Server
Xinference 提供基于原生 Helm 在 Kubernetes 集群中安装的方式。
准备条件
- 一个可用的 Kubernetes 集群。
- 在 Kubernetes 中开启 GPU 支持
- 正确安装 Helm
具体步骤
1、新增 Xinference Helm 仓库
root@master1:~# helm repo add xinference https://xorbitsai.github.io/xinference-helm-charts
"xinference" has been added to your repositories
2、更新仓库索引,查询可安装版本
root@master1:~# helm repo update xinference
Hang tight while we grab the latest from your chart repositories...
...Successfully got an update from the "xinference" chart repository
Update Complete. ⎈Happy Helming!⎈
root@master1:~# helm search repo xinference/xinference --devel --versions
NAME                     CHART VERSION          APP VERSION      DESCRIPTION
xinference/xinference    0.0.2-v0.14.4          v0.14.4          Helm charts for Xinference on Kubernetes
xinference/xinference    0.0.2-v0.13.3          v0.13.3          Helm charts for Xinference on Kubernetes
xinference/xinference    0.0.1-v0.16.2          v0.16.2          Helm charts for Xinference on Kubernetes
xinference/xinference    0.0.1-v0.16.1          v0.16.1          Helm charts for Xinference on Kubernetes
xinference/xinference    0.0.1-v0.16.0          v0.16.0          Helm charts for Xinference on Kubernetes
xinference/xinference    0.0.1-v0.15.4          v0.15.4          Helm charts for Xinference on Kubernetes
xinference/xinference    0.0.1-v0.15.3          v0.15.3          Helm charts for Xinference on Kubernetes
xinference/xinference    0.0.1-v0.15.2          v0.15.2          Helm charts for Xinference on Kubernetes
xinference/xinference    0.0.1-v0.15.1          v0.15.1          Helm charts for Xinference on Kubernetes
xinference/xinference    0.0.1-v0.15.0          v0.15.0          Helm charts for Xinference on Kubernetes
xinference/xinference    0.0.1-v0.14.4          v0.14.4          Helm charts for Xinference on Kubernetes
xinference/xinference    0.0.1-v0.14.3          v0.14.3          Helm charts for Xinference on Kubernetes
xinference/xinference    0.0.1-v0.14.2          v0.14.2          Helm charts for Xinference on Kubernetes
xinference/xinference    0.0.1-v0.14.1          v0.14.1          Helm charts for Xinference on Kubernetes
xinference/xinference    0.0.1-v0.14.0.post1    v0.14.0.post1    Helm charts for Xinference on Kubernetes
xinference/xinference    0.0.1-v0.14.0          v0.14.0          Helm charts for Xinference on Kubernetes
xinference/xinference    0.0.1-v0.13.3          v0.13.3          Helm charts for Xinference on Kubernetes
xinference/xinference    0.0.1-v0.0.4           v0.0.4           Helm charts for Xinference on Kubernetes
xinference/xinference    0.0.1-v0.0.3           v0.0.3           Helm charts for Xinference on Kubernetes
xinference/xinference    0.0.1-v0.0.2           v0.0.2           Helm charts for Xinference on Kubernetes
xinference/xinference    0.0.1-v0.0.1           v0.0.1           Helm charts for Xinference on Kubernetes
xinference/xinference    0.0.1-main             main             Helm charts for Xinference on Kubernetes
3、安装
helm install xinference xinference/xinference -n xinference --version <helm_charts_version> --set config.model_src="modelscope" 4、举例:
helm install xinference xinference/xinference -n xinference --version 0.0.1-v0.16.3 --set config.model_src="modelscope" 常见的自定义安装配置
1、从 ModelScope 下载模型。
helm install xinference xinference/xinference -n xinference --version <helm_charts_version> --set config.model_src="modelscope"2、启动 4 个 Xinference worker 节点,每个 worker 管理 4 个 GPU。
helm install xinference xinference/xinference -n xinference --version <helm_charts_version> --set config.worker_num=4 --set config.gpu_per_worker="4"4、验证是否部署成功
root@master3:~# kubectl get svc -n xinference
NAME                 TYPE        CLUSTER-IP      EXTERNAL-IP   PORT(S)             AGE
service-supervisor   ClusterIP   10.233.22.175   <none>        9999/TCP,9997/TCP   8d
service-web          NodePort    10.233.47.18    <none>        9997:32767/TCP      8d
service-worker       ClusterIP   10.233.32.148   <none>        30001/TCP           8d
部署完成后可以访问 web 的svc地址 进行UI操作

部署模型
安装xinference客户端
pip install xinference部署模型
Rerank
xinference launch --model-name bge-reranker-v2-m3 --model-type rerank -e http://10.84.3.40:30018embedding
xinference launch --model-name bge-large-zh-v1.5 --model-type embedding -e http://10.84.3.40:30018Chat
xinference launch --model-engine ${engine} --model-name qwen2.5-instruct --size-in-billions 0_5 --model-format pytorch --quantization ${quantization} -e http://10.84.3.40:30018- Model Format: pytorch
- Model Size (in billions): 0_5
- Quantizations: 4-bit, 8-bit, none
- Engines: vLLM, Transformers, SGLang (vLLM and SGLang only available for quantization none)
- Model ID: Qwen/Qwen2.5-0.5B-Instruct
- Model Hubs: Hugging Face, ModelScope
- --model-name: 指定部署的模型名称,上方例子的模型名称是bge-reranker-v2-m3
- --model-type:指定部署的模型类型,上方例子的模型类型是rerank
- -e:指定Server地址,上方例子的Server地址是http://10.84.3.40:30018
注意:执行完上方任意一条部署模型指令后都会去ModelScope或Hugging Face下载大模型文件,具体是ModelScope还是Hugging Face需要在环境环境变量中指定XINFERENCE_MODEL_SRC,必须确保网络畅通
Web UI图形化操作
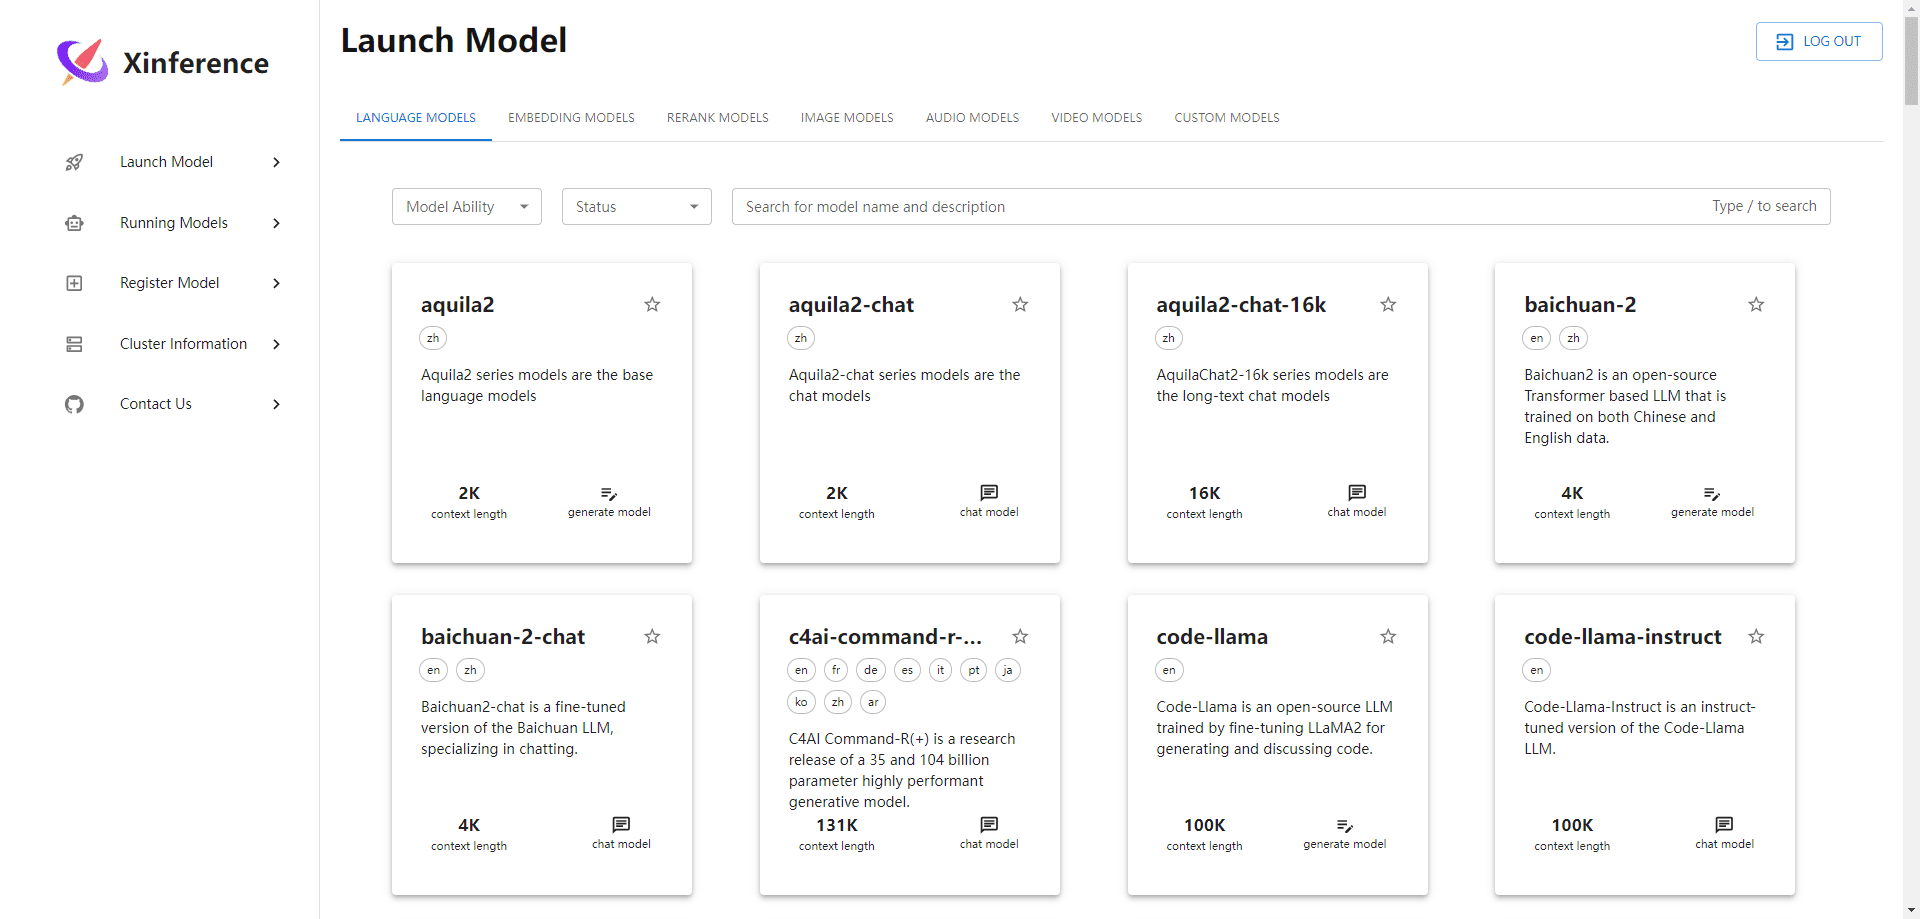
1、部署qwen2.5-instruct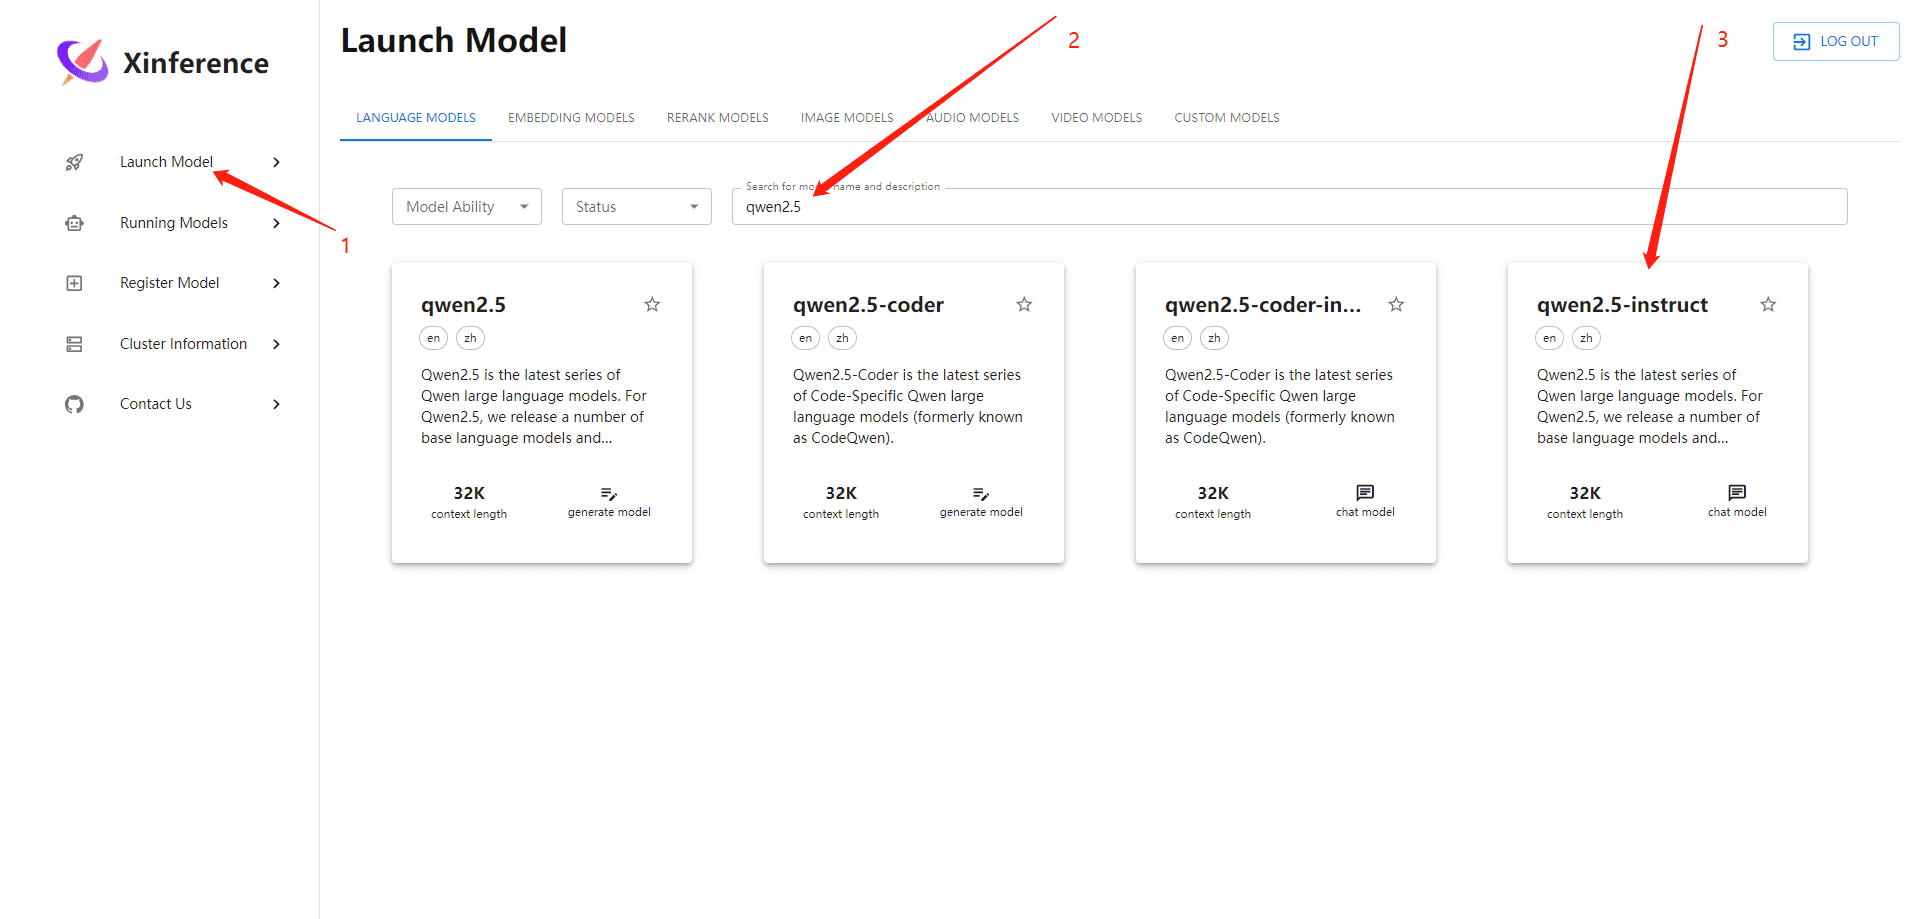
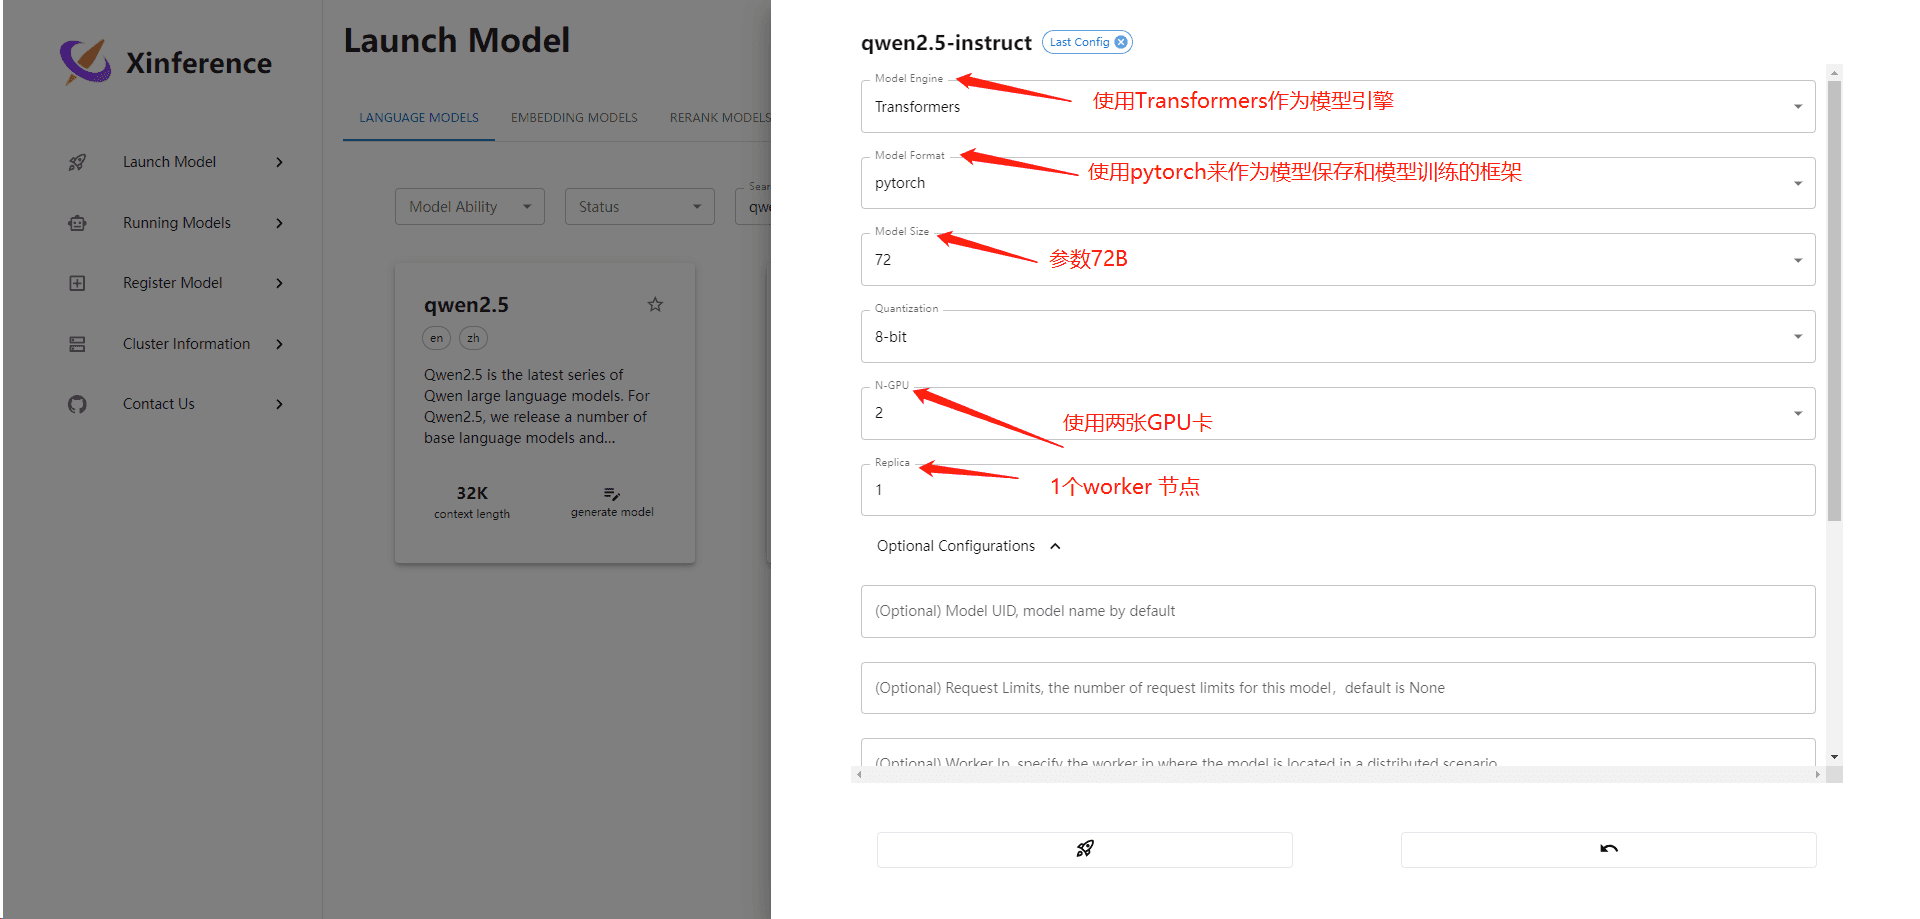
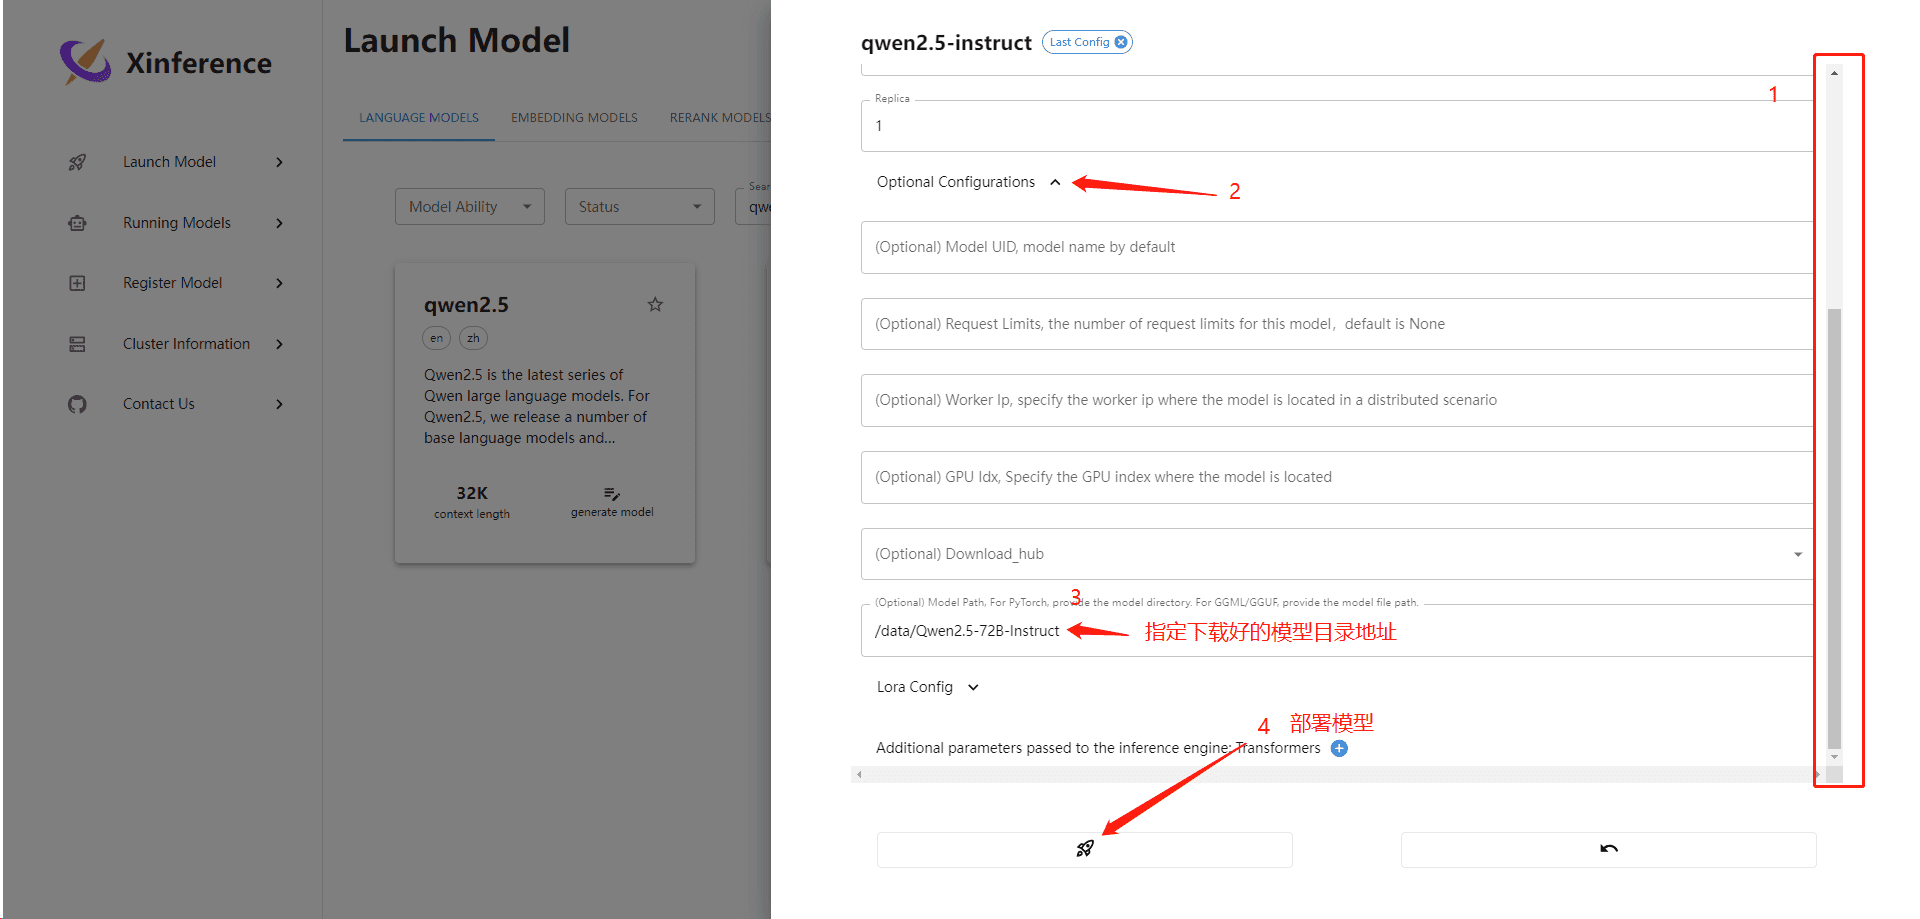
2、验证模型是否部署成功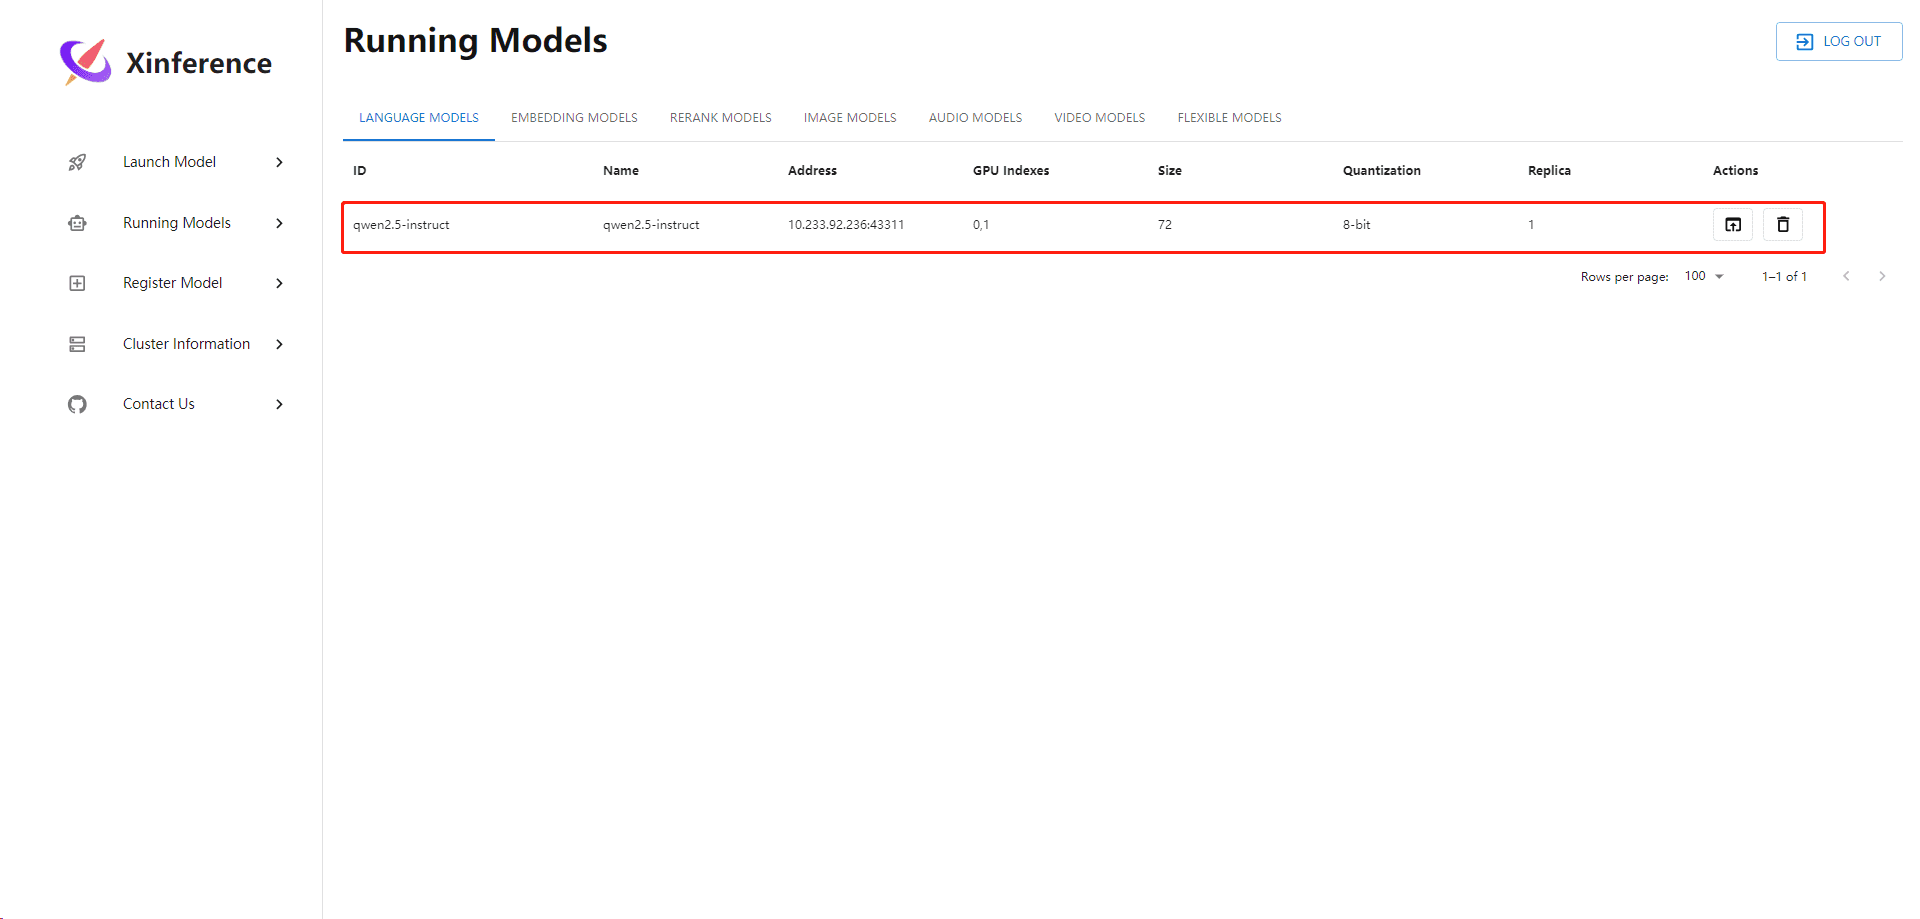
注意:点击部署按钮后,要等一会再验证模型是否部署完成,第一次过程比较慢,可查看xinference-supervisor Pod和xinference-worker的实时日志,看是否有报错,没报错等待即可
自定义模型
xinference launch --model_path <model_file_path> --model-engine <engine> -n qwen1.5-chat -e http://10.84.3.40:30018部署自定义模型与上方部署方式大部分都一样,唯一区别是需要指定模型文件路径,将下载下来的模型文件存放至worker某个目录下,然后通过--model_path指定绝对路径
- --model_path:模型文件路径
- --model-engine:选择加载模型的引擎
- -n:模型名称
xinference认证系统
Xinference 使用了账号密码的模式构建了一个基于内存的 OAuth2 的身份验证和授权系统。
1、创建授权信息的json文件
在启动 Xinference 时,需要指定所有的验证和授权信息。当前,Xinference 需要一个 JSON 文件,其中包含以下特定字段:
{
    "auth_config": {
        "algorithm": "HS256",
        "secret_key": "09d25e094faa6ca2556c818166b7a9563b93f7099f6f0f4caa6cf63b88e8d3e7",
        "token_expire_in_minutes": 30
    },
    "user_config": [
        {
            "username": "user1",
            "password": "secret1",
            "permissions": [
                "admin"
            ],
            "api_keys": [
                "sk-72tkvudyGLPMi",
                "sk-ZOTLIY4gt9w11"
            ]
        },
        {
            "username": "user2",
            "password": "secret2",
            "permissions": [
                "models:list",
                "models:read"
            ],
            "api_keys": [
                "sk-35tkasdyGLYMy",
                "sk-ALTbgl6ut981w"
            ]
        }
    ]
}
auth_config: 这个字段配置与安全相关的信息。
●algorithm: 用于令牌生成与解析的算法。推荐使用 HS 系列算法,例如 HS256,HS384 或者 HS512 算法。
●secret_key: 用于令牌生成和解析的密钥。可以使用该命令生成适配 HS 系列算法的密钥:openssl rand -hex 32 。
●token_expire_in_minutes: 保留字段,表示令牌失效时间。目前 Xinference 开源版本不会检查令牌过期时间。
注意:三个字段缺一不可
user_config: 这个字段用来配置用户和权限信息。每个用户信息由以下字段组成:
●username: 字符串,表示用户名
●password: 字符串,表示密码
●permissions: 字符串列表,表示该用户拥有的权限。权限描述如上权限部分文档所述。
●api_keys: 字符串列表,表示该用户拥有的 api-key 。用户可以通过这些 api-key ,无需登录步骤即可访问 xinference 接口。这里的 api_key 组成与 OPENAI_API_KEY 相似,总是以 sk- 开头,后跟 13 个数字、大小写字母。
2、启用具有身份验证和授权系统的 Xinference
使用 --auth-config 选项启用具有身份验证和授权系统的 Xinference。例如,本地启动的命令如下所示:
xinference-local -H 0.0.0.0 --auth-config /path/to/your_json_config_file在kubernetes中需要在启动 supervisor 时指定这个选项:
xinference-supervisor -H <supervisor_ip> --auth-config /path/to/your_json_config_file示例:
将auth.json通过挂载pvc的方式挂载至Pod中,然后在启动时通过args指定auth.json的路径,使用cofigmap挂载至Pod中也可以
apiVersion: apps/v1
kind: Deployment
metadata:
  annotations:
    deployment.kubernetes.io/revision: "7"
    meta.helm.sh/release-name: xinference
    meta.helm.sh/release-namespace: xinference
  generation: 7
  labels:
    app.kubernetes.io/instance: xinference
    app.kubernetes.io/managed-by: Helm
    app.kubernetes.io/name: xinference
    app.kubernetes.io/version: v0.16.3
    helm.sh/chart: xinference-v0.16.3
  name: xinference-supervisor
  namespace: xinference
  resourceVersion: "172200892"
  uid: c7f78984-f5dd-4a48-8e8d-c48f7fffe96d
spec:
  progressDeadlineSeconds: 600
  replicas: 1
  revisionHistoryLimit: 10
  selector:
    matchLabels:
      app: xinference-supervisor
      app.kubernetes.io/instance: xinference
      app.kubernetes.io/name: xinference
  strategy:
    rollingUpdate:
      maxSurge: 25%
      maxUnavailable: 25%
    type: RollingUpdate
  template:
    metadata:
      creationTimestamp: null
      labels:
        app: xinference-supervisor
        app.kubernetes.io/instance: xinference
        app.kubernetes.io/name: xinference
    spec:
      containers:
      - args:
        - --port
        - "9997"
        - --host
        - $(POD_IP)
        - --supervisor-port
        - "9999"
        - --auth-config  #新增--auth-config
        - /auth/Qwen2.5-72B-Instruct/auth.json  #指定auth文件路径
        - --log-level
        - debug
        command:
        - xinference-supervisor
        env:
        - name: POD_IP
          valueFrom:
            fieldRef:
              apiVersion: v1
              fieldPath: status.podIP
        - name: XINFERENCE_POD_NAME
          valueFrom:
            fieldRef:
              apiVersion: v1
              fieldPath: metadata.name
        image: registry.cn-hangzhou.aliyuncs.com/xprobe_xinference/xinference:v0.16.3
        imagePullPolicy: IfNotPresent
        name: supervisor
        ports:
        - containerPort: 9997
          name: web
          protocol: TCP
        - containerPort: 9999
          name: oscar
          protocol: TCP
        resources:
          requests:
            cpu: "1"
            memory: 4Gi
        terminationMessagePath: /dev/termination-log
        terminationMessagePolicy: File
        volumeMounts:
        - mountPath: /auth
          name: xinference-auth
      dnsPolicy: ClusterFirst
      restartPolicy: Always
      schedulerName: default-scheduler
      securityContext: {}
      terminationGracePeriodSeconds: 30
      volumes:
      - name: xinference-auth
        persistentVolumeClaim:
          claimName: xinference-auth-pvc
GPUStack
GPUStack官网:https://docs.gpustack.ai/latest/overview/
在kubernetes 中部署GPUStack
部署前提条件
- 有一个能正常工作的Kubernetes 集群
- Kubernetes 集群能够调度显卡资源
集群版本
root@master3:~/qwx/gpustack# kubectl version
Client Version: version.Info{Major:"1", Minor:"23", GitVersion:"v1.23.10", GitCommit:"7e54d50d3012cf3389e43b096ba35300f36e0817", GitTreeState:"clean", BuildDate:"2022-08-17T18:32:54Z", GoVersion:"go1.17.13", Compiler:"gc", Platform:"linux/amd64"}
Server Version: version.Info{Major:"1", Minor:"23", GitVersion:"v1.23.10", GitCommit:"7e54d50d3012cf3389e43b096ba35300f36e0817", GitTreeState:"clean", BuildDate:"2022-08-17T18:26:59Z", GoVersion:"go1.17.13", Compiler:"gc", Platform:"linux/amd64"}
显卡型号和显存大小
root@gpustack-54964f7987-vbg99:/# nvidia-smi
Wed Dec 25 06:05:27 2024
+-----------------------------------------------------------------------------------------+
| NVIDIA-SMI 550.54.15              Driver Version: 550.54.15      CUDA Version: 12.4     |
|-----------------------------------------+------------------------+----------------------+
| GPU  Name                 Persistence-M | Bus-Id          Disp.A | Volatile Uncorr. ECC |
| Fan  Temp   Perf          Pwr:Usage/Cap |           Memory-Usage | GPU-Util  Compute M. |
|                                         |                        |               MIG M. |
|=========================================+========================+======================|
|   0  NVIDIA A100 80GB PCIe          On  |   00000000:36:00.0 Off |                    0 |
| N/A   41C    P0             86W /  300W |   64468MiB /  81920MiB |      0%      Default |
|                                         |                        |             Disabled |
+-----------------------------------------+------------------------+----------------------+
|   1  NVIDIA A100 80GB PCIe          On  |   00000000:37:00.0 Off |                    0 |
| N/A   39C    P0             83W /  300W |   64466MiB /  81920MiB |      0%      Default |
|                                         |                        |             Disabled |
+-----------------------------------------+------------------------+----------------------+
|   2  NVIDIA A100 80GB PCIe          On  |   00000000:9B:00.0 Off |                    0 |
| N/A   53C    P0             95W /  300W |   64454MiB /  81920MiB |      0%      Default |
|                                         |                        |             Disabled |
+-----------------------------------------+------------------------+----------------------+
|   3  NVIDIA A100 80GB PCIe          On  |   00000000:9C:00.0 Off |                    0 |
| N/A   49C    P0             89W /  300W |   64454MiB /  81920MiB |      0%      Default |
|                                         |                        |             Disabled |
+-----------------------------------------+------------------------+----------------------+
|   4  NVIDIA A100 80GB PCIe          On  |   00000000:9D:00.0 Off |                    0 |
| N/A   49C    P0             92W /  300W |   44580MiB /  81920MiB |      0%      Default |
|                                         |                        |             Disabled |
+-----------------------------------------+------------------------+----------------------+

+-----------------------------------------------------------------------------------------+
| Processes:                                                                              |
|  GPU   GI   CI        PID   Type   Process name                              GPU Memory |
|        ID   ID                                                               Usage      |
|=========================================================================================|
+-----------------------------------------------------------------------------------------+
部署GPUStack
apiVersion: apps/v1
kind: Deployment
metadata:
  name: gpustack
  namespace: gpustack
spec:
  replicas: 1
  selector:
    matchLabels:
      app: gpustack
  template:
    metadata:
      labels:
        app: gpustack
    spec:
      volumes:
        - name: gpustack-data    # gpustack数据持久化
          persistentVolumeClaim:
            claimName: gpustack-pvc
        - name: models0#        #模型文件存放的位置
          persistentVolumeClaim:
            claimName: models0
        - name: cache-volume #shm 共享内存
          emptyDir:
            medium: Memory
            sizeLimit: 256Mi
      containers:
        - name: gpustack
          image: 'gpustack/gpustack:v0.4.1'
          args:
            - '--port'
            - '80'
          ports:
            - containerPort: 80
              protocol: TCP
          env:
            - name: NCCL_DEBUG
              value: TRACE
          resources:
            limits:
              nvidia.com/gpu: '5'
            requests:
              nvidia.com/gpu: '5'
          volumeMounts:
            - name: gpustack-data
              mountPath: /var/lib/gpustack
            - name: models0
              mountPath: /models0 #模型文件挂载路径
            - name: cache-volume
              mountPath: /dev/shm
          terminationMessagePath: /dev/termination-log
          terminationMessagePolicy: File
          imagePullPolicy: IfNotPresent
      restartPolicy: Always
---
apiVersion: v1
kind: Service
metadata:
  name: gpustack
  namespace: gpustack
spec:
  ports:
    - port: 80
      targetPort: 80
      nodePort: 30145
  selector:
    app: gpustack
  type: NodePort
验证服务是否有问题
查看Pod log信息
2024-12-25T04:56:53+00:00 - gpustack.server.server - INFO - Starting GPUStack server.
2024-12-25T04:56:53+00:00 - gpustack.server.server - INFO - Running database migration.
2024-12-25T04:56:53+00:00 - gpustack.server.server - INFO - Database migration completed.
2024-12-25T04:56:53+00:00 - gpustack.server.server - INFO - Serving on 0.0.0.0:80.
2024-12-25T04:56:53+00:00 - gpustack.scheduler.scheduler - INFO - Scheduler started.
2024-12-25T04:56:57+00:00 - gpustack.worker.worker - INFO - Starting GPUStack worker.
2024-12-25T04:56:57+00:00 - gpustack.worker.worker - INFO - Serving worker APIs on 0.0.0.0:10150.
2024-12-25T04:56:57+00:00 - gpustack.worker.worker - INFO - Worker IP changed from 10.233.92.120 to 10.233.92.217
2024-12-25T04:56:57+00:00 - gpustack.worker.worker_manager - INFO - Registering worker: gpustack-85d65c6dd8-4lmrh
2024-12-25T04:56:57+00:00 - gpustack.worker.exporter - INFO - Serving metric exporter on 0.0.0.0:10151.
2024-12-25T04:56:57+00:00 - gpustack.scheduler.calculator - INFO - Calculating resource claim for model instance Llama-3.1-Nemotron-70B-Instruct-5F8of
2024-12-25T04:56:57+00:00 - gpustack.scheduler.calculator - INFO - Calculated resource claim for full offload model instance Llama-3.1-Nemotron-70B-Instruct-5F8of, claim: memoryEstimate(fullOffloaded=True, ram=layerMemoryEstimate(uma=1126243128, nonuma=1283529528, handleLayers=0), vrams=[layerMemoryEstimate(uma=44606428160, nonuma=46059758592, handleLayers=80)], offloadLayers=81)
2024-12-25T04:56:58+00:00 - transformers_modules.configuration_internvl_chat - INFO - vision_select_layer: -1
2024-12-25T04:56:58+00:00 - transformers_modules.configuration_internvl_chat - INFO - ps_version: v2
2024-12-25T04:56:58+00:00 - transformers_modules.configuration_internvl_chat - INFO - min_dynamic_patch: 1
2024-12-25T04:56:58+00:00 - transformers_modules.configuration_internvl_chat - INFO - max_dynamic_patch: 12
2024-12-25T04:57:00+00:00 - gpustack.worker.worker_manager - INFO - Started RPC server for GPU 0 on port 50073, pid 240
2024-12-25T04:57:00+00:00 - gpustack.worker.worker_manager - INFO - Started RPC server for GPU 1 on port 50724, pid 241
2024-12-25T04:57:00+00:00 - gpustack.worker.worker_manager - INFO - Started RPC server for GPU 2 on port 50137, pid 242
2024-12-25T04:57:00+00:00 - gpustack.worker.worker_manager - INFO - Started RPC server for GPU 3 on port 50300, pid 243
2024-12-25T04:57:00+00:00 - gpustack.worker.worker_manager - INFO - Started RPC server for GPU 4 on port 50468, pid 244
2024-12-25T04:57:00+00:00 - gpustack.worker.serve_manager - INFO - Start serving model instance Llama-3.1-Nemotron-70B-Instruct-5F8of on port 40158
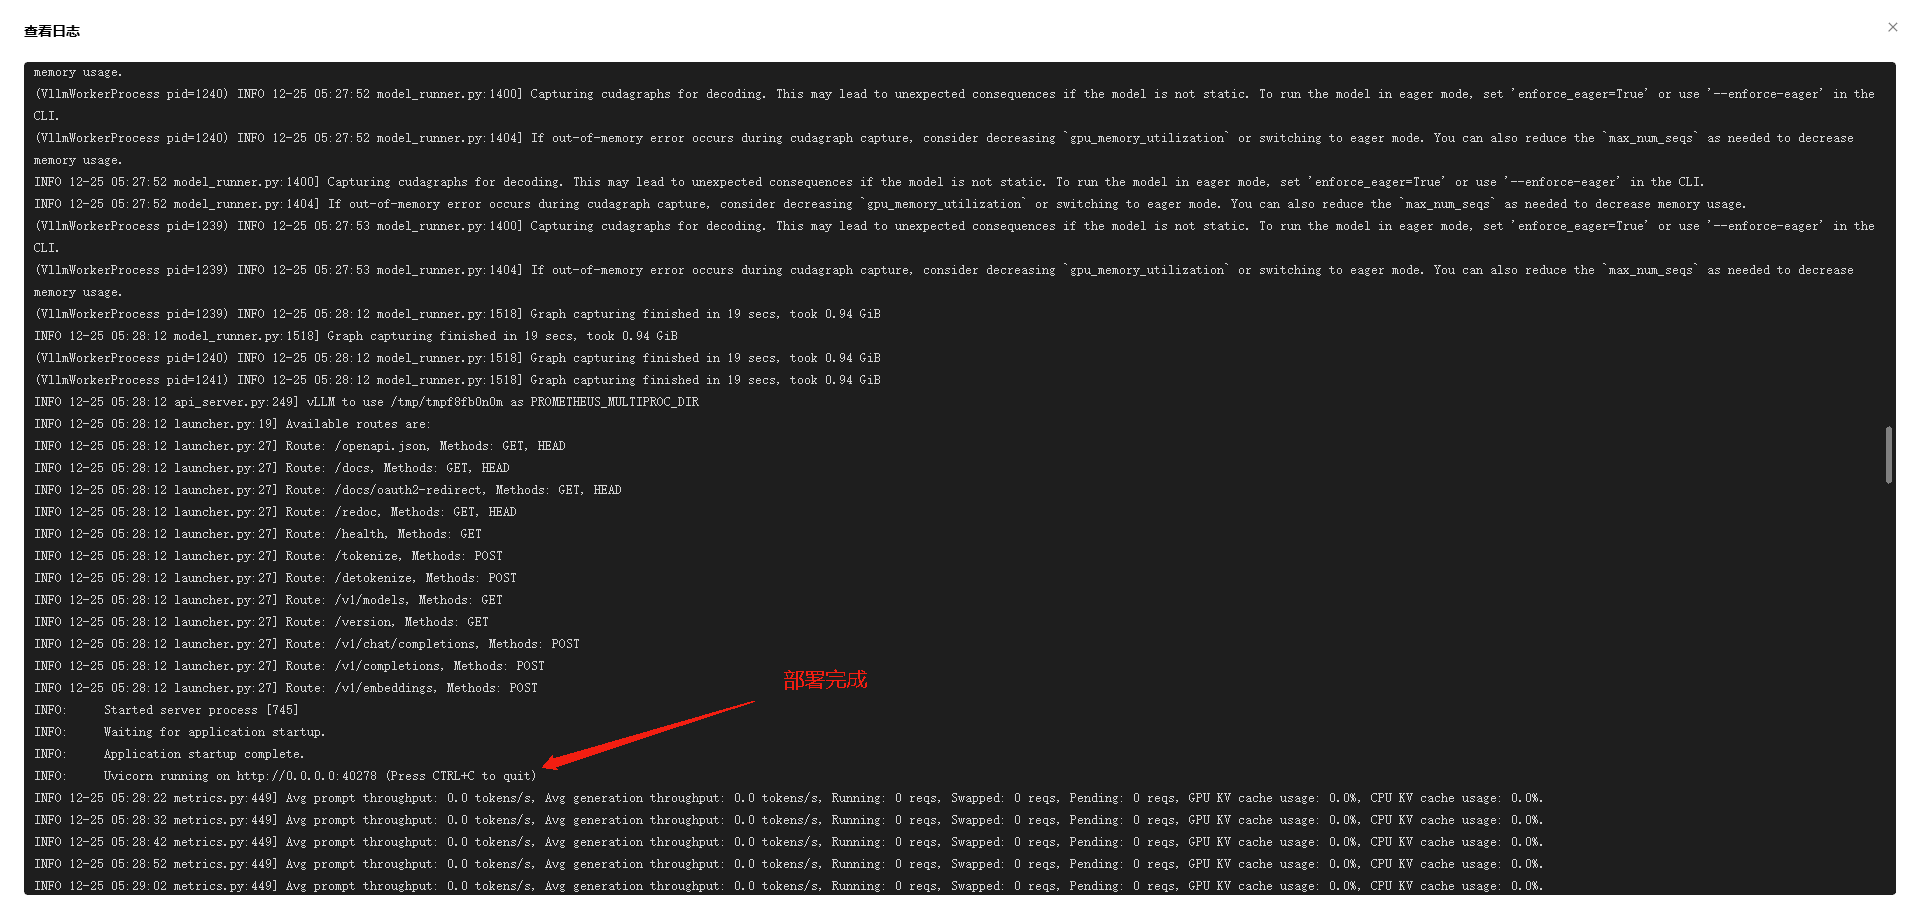
2024-12-25T04:57:00+00:00 - gpustack.worker.serve_manager - INFO - Start serving model instance InternVL2_5-78B-TZwmv on port 40278访问web 端
访问地址:http://HOSTIP:PROT
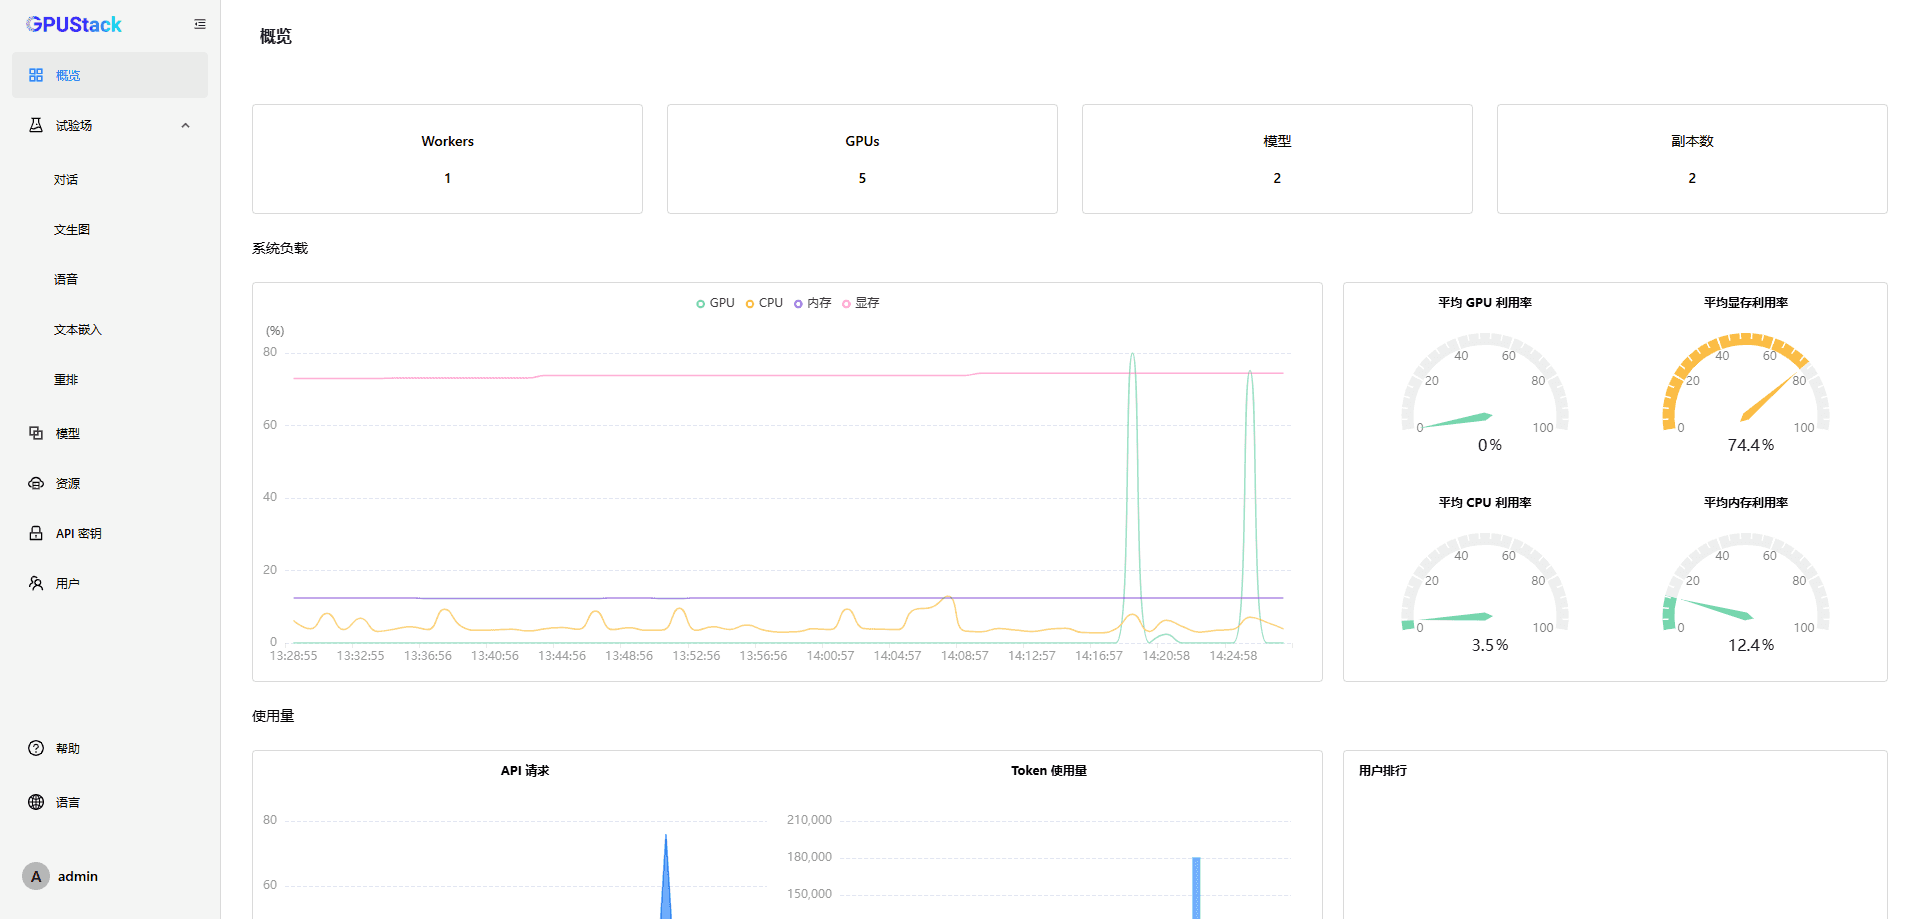
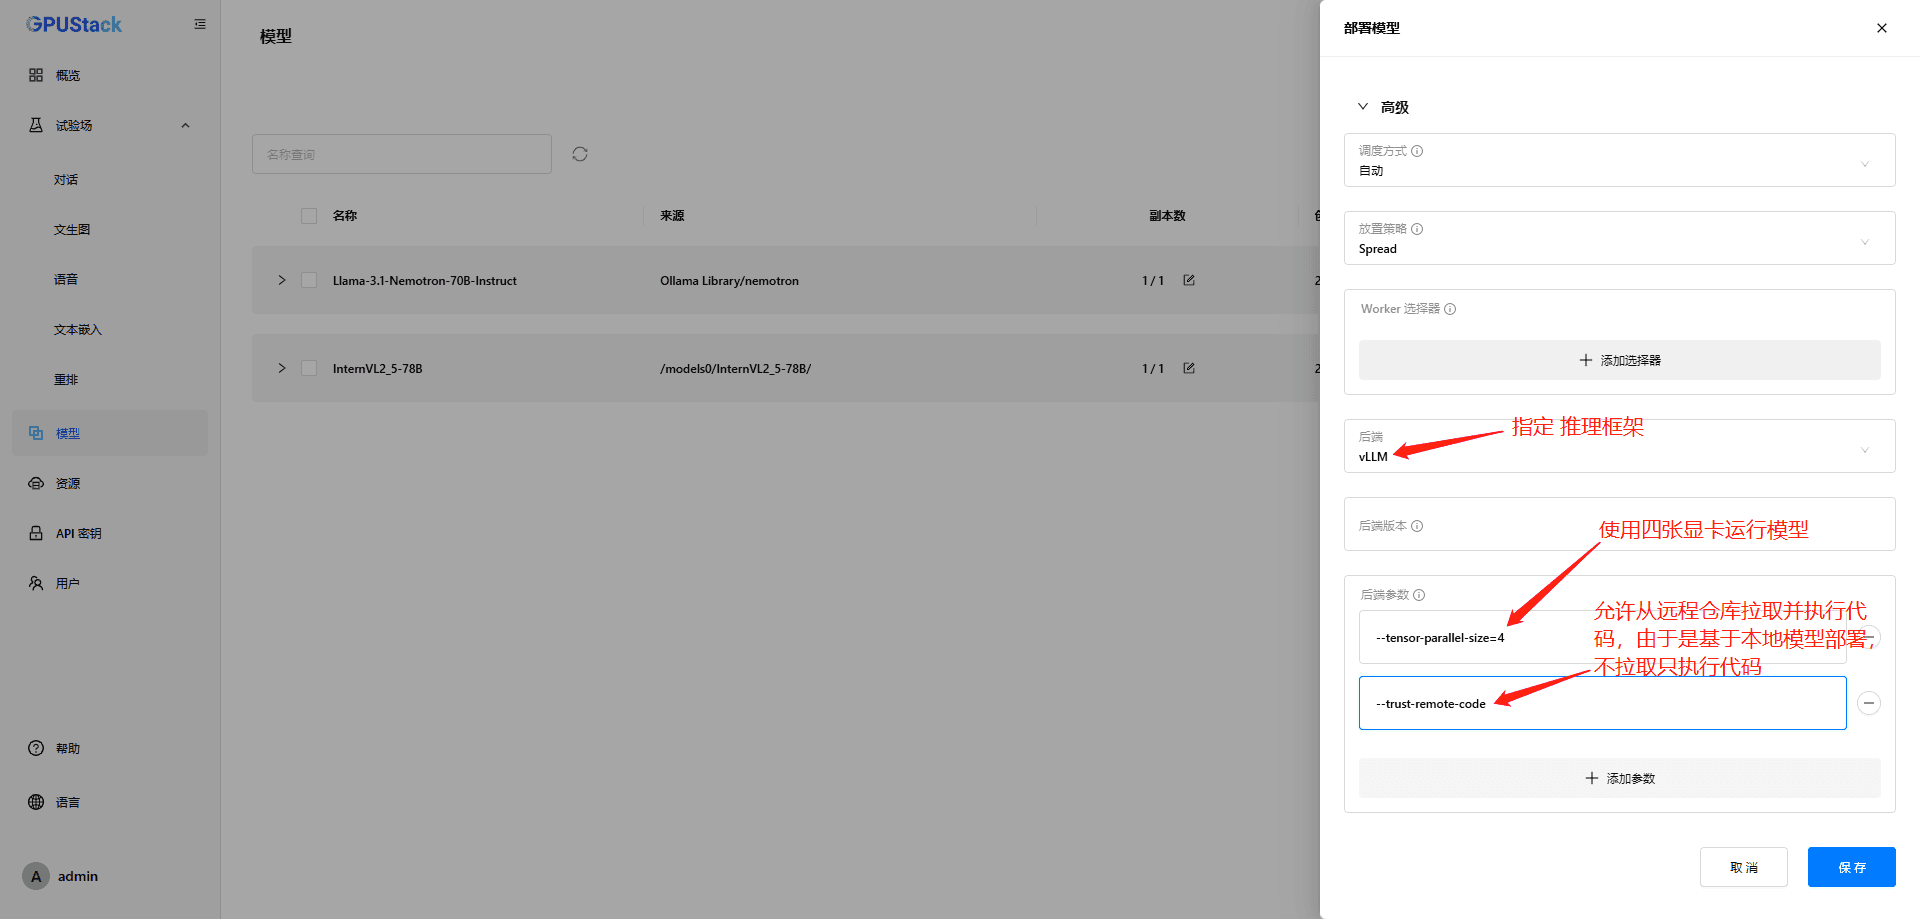
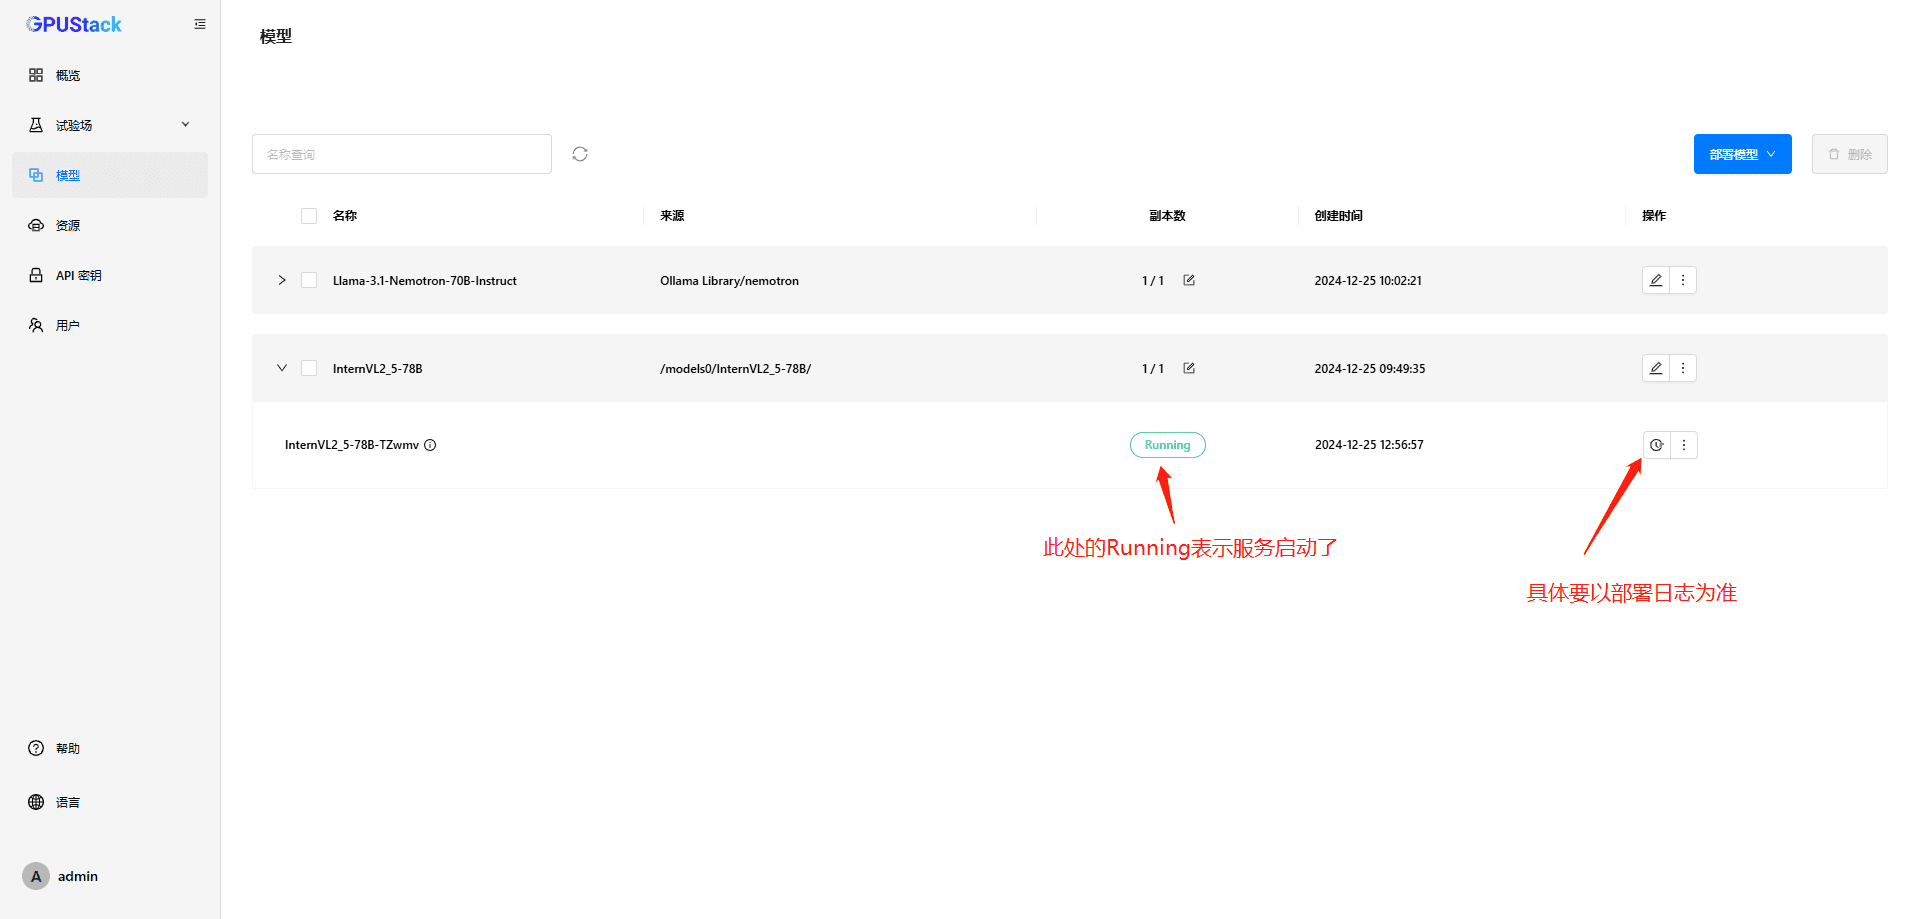
部署模型(单机版)
本地部署模型
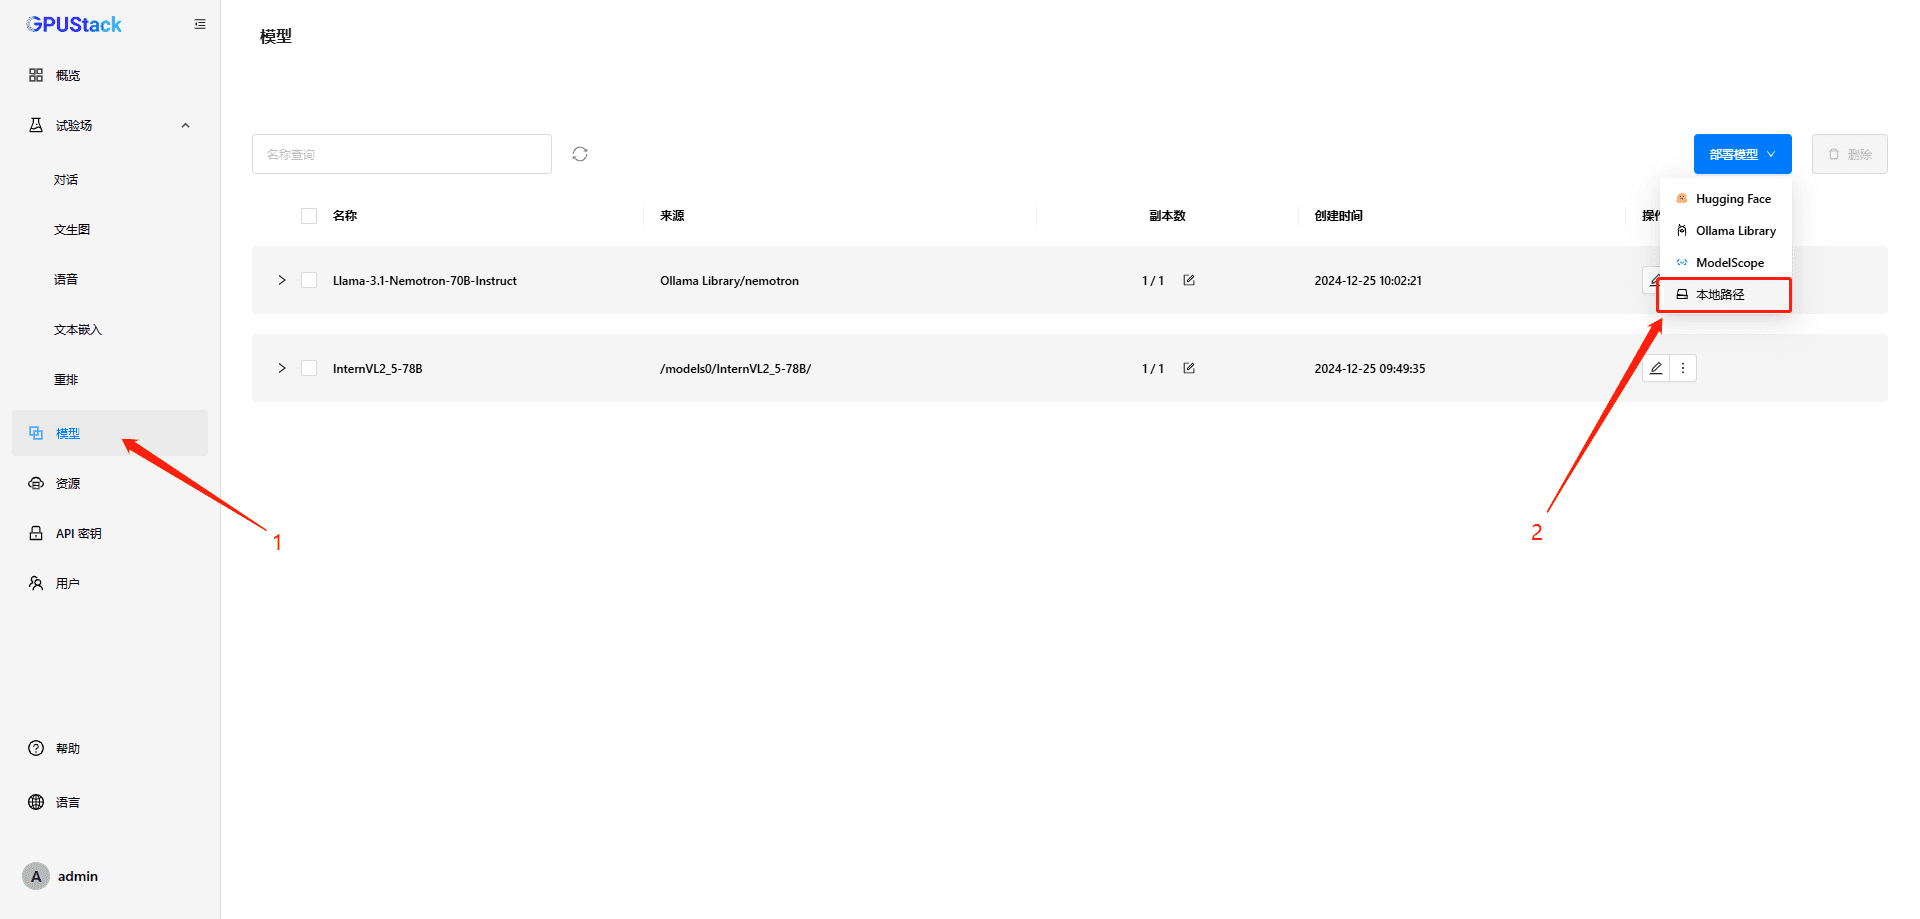
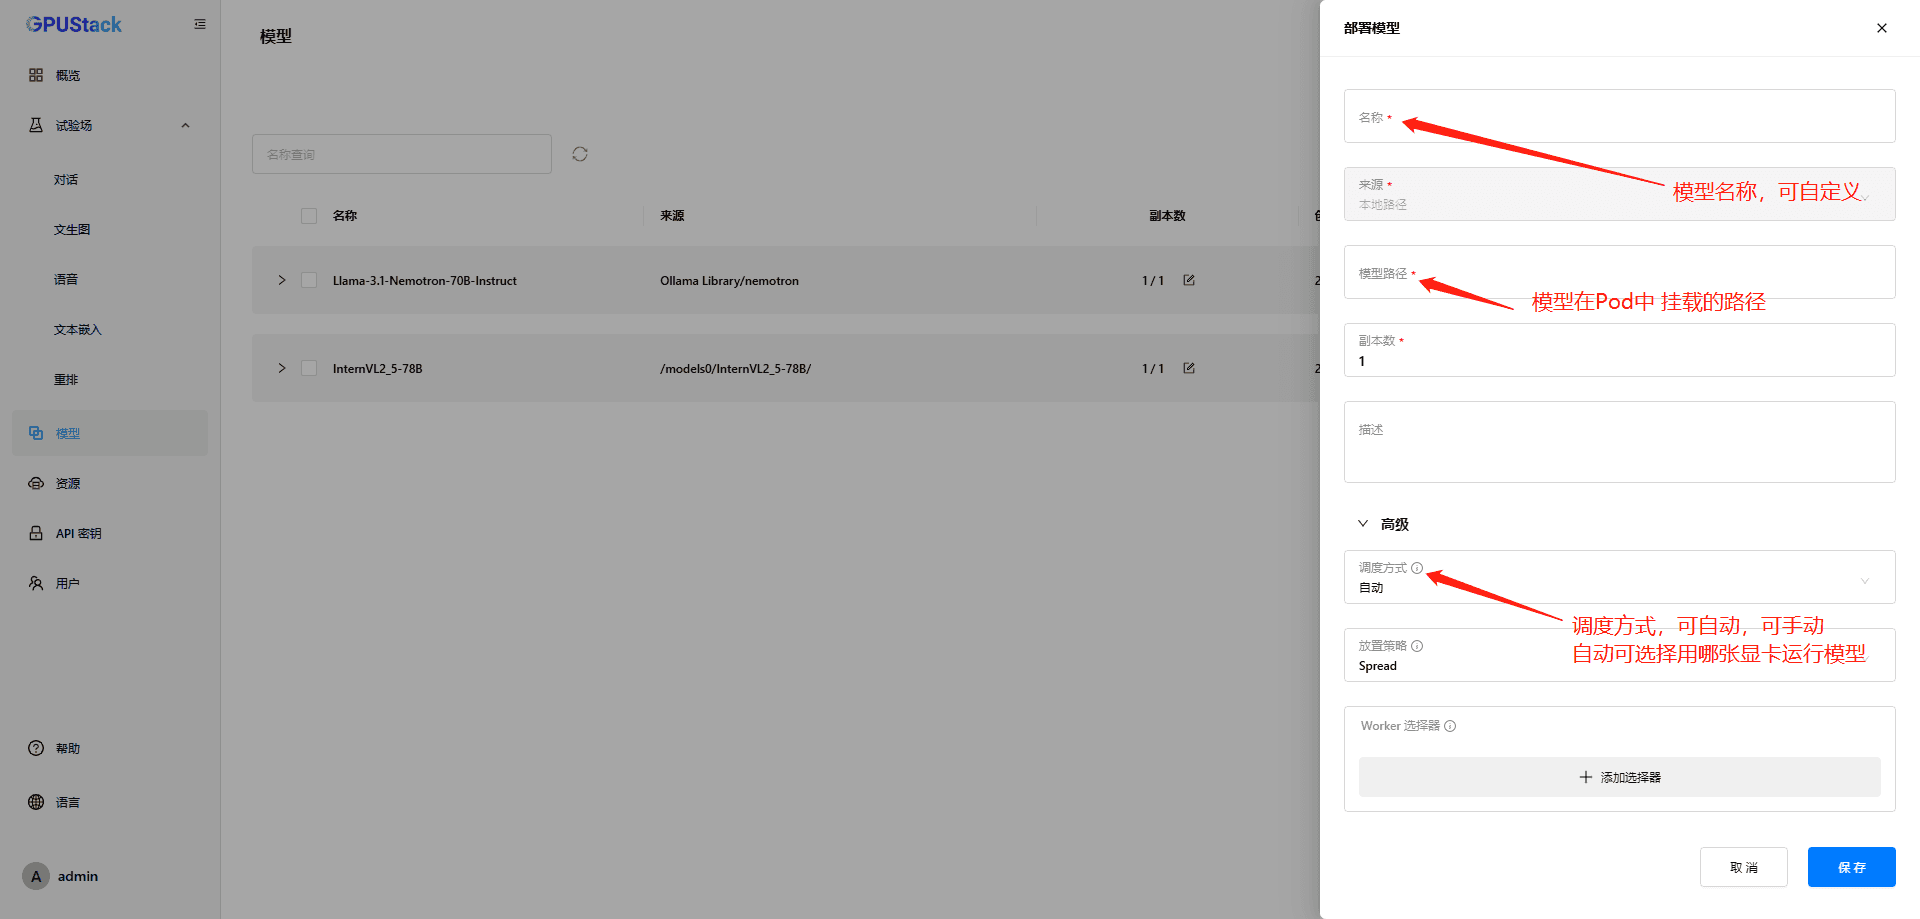

3 条评论
请问这个硬件配置要求是怎么样的OωO
你说的硬件配置指什么? 是模型管理器的硬件配置,还是模型的硬件配置?模型管理器的硬件配置要求不高的,重要的是模型的硬件配置
请问这个硬件配置要求是怎么样的OωO